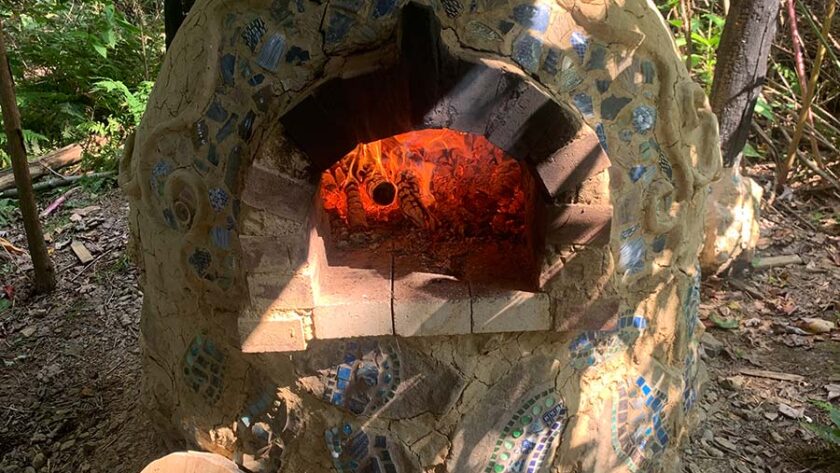
One of the great joys and challenges of our present time is finding a way into a deeper connection with our ancestors, the living earth and her processes, and our own human gifts. A lot of this practice is slowing down, putting some distance between ourselves and the broader culture, and finding new ways of being, inhabiting, and connecting with the world around us in peace, grace, and gratitude. One of the ways we have been working towards on the Druid’s Garden homestead is through reconnecting with more traditional methods of cooking–hearth cooking, cooking over fire, and most recently, building and working with an earth oven (see: earth oven build part I and part II). Consequently, AODA also developed and enacted a community-wide Hearth-themed ritual with the aim of caring for ourselves, our families, and our communities, so I think some of these ideas of the hearth and centering our hearths is spreading in the druid community. In today’s post, I’m following up to my earth oven build posts (see above) and I’ll share what I’ve learned on how to cook with an earth oven. It really is an incredible experience.
Connection, Cob, and Cooking
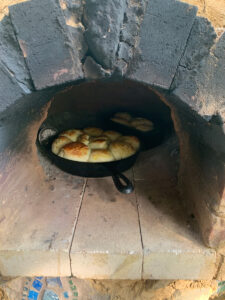
In A Reverence for Wood, Eric Sloane describes how humanity’s relationship with wood, fire, and cooking has changed through the years, particularly in the United States from colonial times through the present. He notes that the invention of the cast iron stove in the 1800’s during the industrial revolution transitioned people away from traditional hearths (where you tended a fire, which required skill to cook) and began the transition to more modern, disconnected relationships with cooking and heating. Sloane discusses how the cast iron stove “unceremoniously boxed up” the wood and now no longer allowed for interaction with fire directly nor required as much tending. Of course, things have gone a lot further in the direction of disconnection since then–again in the name of efficiency and convenience, the technologies that we rely on today–gas or electric ovens, stovetops, and microwaves, have taken this much further. A modern oven is one you don’t really think about–you simply it to the desired temperature and then cook. It is almost always consistent and requires no tending (and if it needs to be tended, you pay someone to do it). There is no real relationship with fire, or with the hearth, beyond if it works or not. And while this is certainly convenient–and even necessary given many time-starved modern lifestyles–this has led to the loss of our ancestral relationship with fire, with hearths, and with cooking.
I think that this idea of reconnection is a major part of the appeal of the earth oven. You build the earth oven yourself, laboring and toiling to dig the clay, gather what you need from the land, mix the clay with your own feet, and shape the oven with your own hands. This is a slow process, working with the earth and at the speed of the earth. It has to be built over a period of days or weeks to allow everything to dry in between, and sourcing the materials and gathering them also takes time. Once the oven is built, you can gather sticks that fell from trees (all you need) and then build fire, which needs to be tended for several hours before you can bake. Baking itself is a skill and an art, knowing how to measure the heat of the oven, what to bake, and in what order. Every part of this process requires your attention, your connection, and your own spirit to have happened. The earth oven asks us to deeply connect to the fire and the hearth asks us to develop skills in cooking, timing meals, and in training our own observation skills. And–the earth oven produces some of the most wonderful tasting and incredible food you will ever eat!
So come with me on a journey about how to fire–and bake–in an earth oven. I’ll share this with a caveat–I’ve been baking in the oven for two years now, and have hosted a few larger events where we’ve done a lot of baking for a dozen or more people…and I feel like I still have a lot to learn. There are not really a lot of guides out there on how to do this, so it has been a lot of experimentation. If anyone else has built one and has tips, please share!
Initial Considerations and Tools
Before you start baking, you will need to have the right tools to keep things safe and make your baking experience the most effective it can be.
Fireproof Gloves
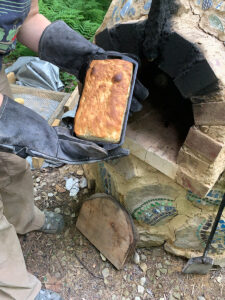
In order to work with an oven that can get 800 degrees or more, you will need an appropriate pair of fireproof gloves. Your typical oven mitts will NOT work for this–they will get burned and sooty (I speak from experience) and may cause you to get burned. They can also melt at those high temperatures. I suggest a pair of fireproof leather gloves (may also be called “welding gloves”). These will get sooty, so they should really be kept just for your oven. They can be found online for under $30.
Appropriate Cookware
Another feature of your oven is thinking about what you want to put in it in terms of baking ware. Pizzas, flatbreads, and some vegetables are baked right on the hearth, but everything else needs some kind of dish. I try to stick with my cast iron cookware, particularly at higher heat. I would never put something like silicone baking trays or those with non-stick surfaces in the oven–the oven floor is so much hotter than a conventional oven, so you want something that can withstand more heat than a conventional oven (which is a rack, and not really putting too much direct heat on the surface of your bakeware). I also don’t know what kinds of chemicals silicone and other fancy baking tools emit–and those will go right into the walls of your oven. I have used baking earthenware, pottery, and glassware when the oven is under 500 without difficulty.
Monitoring Your Temperature
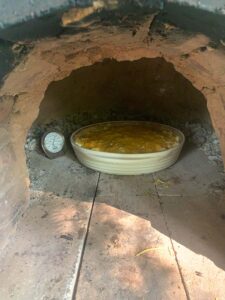
You can monitor your temperature with an old-school oven thermometer. I like an all-metal thermometer–it can handle the higher heat in the oven and is accurate. You can see my thermometer in the macaroni and cheese photo above. This kind of thermometer works better than anything else, but the thermometer often only goes to 600, so above that it will just be “off the scale”. As you bake with your oven, you will start to learn the different temperatures based on how things react, and also how hot the outside of the oven is. Nearly all earth ovens also have a crack somewhere, and sometimes the size of the crack can be another good indication of where it is at temperature wise.
Pizza Peel
If you plan on doing pizzas or flatbreads, you will also need a metal pizza peel for your oven. I made mine myself from an old, flat aluminum baking tray and an old handle I cut off from a shovel. I wired it together and it works great. I had to make it a custom size to fit through the door of the oven. A wooden pizza peel will not work for this kind of oven.
Baking and Firing Doors
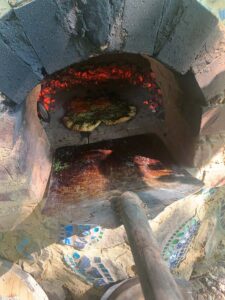
A final thing you should have for your oven is two doors–a firing door (made of meta, with an opening on the bottom to allow fresh air into the fire) and a baking door (made of wood). The firing door is used to fire the oven–you can keep the door on and this allows you to have to fire the oven less than without the door.
Your baking door is for use while you are baking in your oven. You can soak your baking door while the oven is firing. This allows the door to put some extra moisture into the oven when it bakes–which makes your foods–breads, pizzas, casseroles, etc–way tastier than you have ever experienced!
I made both of my doors custom for my oven. I used tin snips and another old aluminum baking tray (I had two, one turned into the firing door and one into the pizza peel). I attached a wooden front and screwed the whole thing together, also adding a handle (you need a handle or you will burn yourself). I got a solid piece of pine and made the baking door by cutting and sanding it down till it fit snugly. I used two pieces of driftwood that I found while I was kayaking to make the handles on the doors–I just screwed them right in.
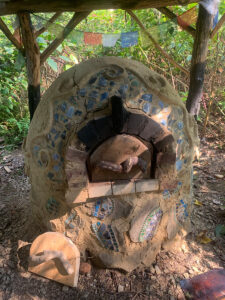
Step 1: Firing the Oven
Your earth oven will interact with the world around you, and thus, the time it takes to fire it to a proper baking temperature depends on a few different things:
- The temperature outside–it takes longer to heat the oven to a proper temperature when it is 25 degrees than 85 degrees outside
- The build of your oven, which includes the overall diameter (a larger oven takes longer to fire), amount of insulation (how much heat escapes), and also how your door is structured (some create a chimney which may help–I don’t have a chimney on mine!). Because I messed up my insulation and had a dangerous crack, I had to do a second layer of insulation on my oven, so my oven is particularly well insulated (also with many little old tincture bottles!). I think this allows it to hold heat very well, reducing firing time.
- The use of a firing door, which can reduce firing time by an hour or more (a firing door is a metal door that has space for the inflow of oxygen and outflow of smoke, but holds much more heat in the oven, thus reducing firing time.
I found that my ideal oven firing time for most of the year is 2.5 – 3 hours. I fire the oven for 2.5 hours and then allow the fire to die down enough to pull the coals out (about 20-30 min). I add 30 min to my firing time when it is cold out (under 45 degrees). This firing time will get me to the 800-900 degree range for firing pizzas and flatbreads. If I only wanted to bake bread and other lower-temperature foods, I could fire it for two hours and that would be sufficient for baking bread. When you build your own oven, you’ll have to spend some time experimenting to see how long you need to fire it to achieve–and hold–the heat you want to hold.
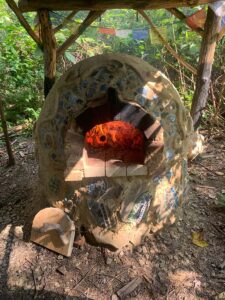
Your oven requires wood to fire. What I usually do is just go foraging around our 5-acre property for sticks–you want sticks that are smaller than your wrist. The fire you want in your oven is hot and fast–the idea being that you can have the flames touch all parts of the oven. Thus, building it with dry sticks and feeding it every 20 minutes is the easiest way to achieve this. Once the fire is going, you can go about your day, just check in on your fire every 20 or so minutes to add more wood.
The other thing that I have found that is particularly helpful in starting the oven is one of those little blow tubes to add more oxygen to the fire. I use this for about the first five minutes to get the fire going well. You don’t need this, but it speeds up the process and can resurrect a fire if you neglected it.
I usually also make an offering of dried aromatic herbs (mugwort, sage, etc) that I use as part of my fire-starting bundle. I like to honor the hearth when I start with this herbal offering and also express my physical gratitude to the oven. These herbs are part of the rituals I have made to use the oven with gratitude and honor to my ancestors.
Finally, the oven doesn’t seem to need that much wood. A five-gallon bucket packed with sticks is usually about what I need to fire for cooking. You can maintain a little stack of wood–an hour of foraging and cutting is usually enough to fire the oven 2-3 times.
Step 2: Preparing the Oven for Baking
After you’ve fired the oven for the right amount of time, it is time to pull out the coals. To do this safely, you will want a fire-proof ash bucket and place to put your ashes, fireproof gloves, and a a fireplace ash shovel. These are pretty much the same tools you’d use for an indoor wood stove.
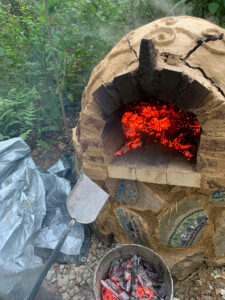
When you pull the coals, if you are doing high-heat cooking, like pizza or flatbread cooking, you will want to leave a ring of coals around the outside so that you can maintain the high heat for as long as possible (see information on baking sequence, next section). Doing this and keeping the baking door on the oven in between pizzas, you can actually bake up to 12-15 pizzas before the oven cools!
If you are also cooking pizzas and flatbreads right on the hearth, you will want to take a 100% cotton cloth that is wet, and with your fire gloves on, briefly wipe down the hearth floor of ash so you have a nice baking surface. After you’ve done this, immediately close the oven with your baking door before putting your first pizza in.
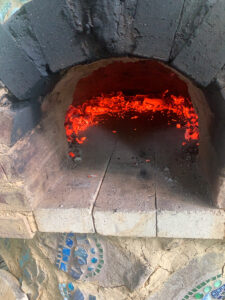
You will want to think about where you will put the extra hot coals–if you have a nearby outdoor fire pit, that works great. We actually have our maple sap boiler in the same area as our earth oven, so I typically put the ashes in the boiler area.
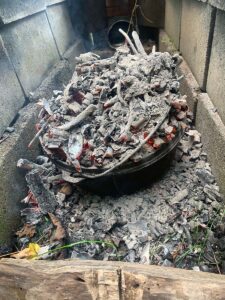
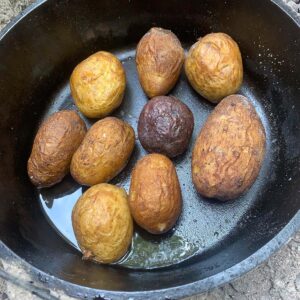
You can also use the extra hot coals that you removed from the oven for cooking in a dutch oven. I typically will prepare and throw some potatoes in my dutch oven–I poke them a few times with a fork, rub them in olive oil, and add a little salt. They bake in the dutch oven for about 50-60 min and then are done. Once you have ash, you can spread that ash on your garden to add potassium to the soil. Nothing at all is wasted in this process and waste becomes a resource!
Step 3: Baking!
Here’s the moment you have been waiting for–baking in your oven. The earth oven works very differently than a standard oven. It goes from very hot, and over a period of hours, cools down. You can control the heat with the ring of coals (to keep it very hot longer) and also by either keeping the door on or off (the door off lets the oven cool quickly). This means that you can bake many, many things in the oven over a period of hours–you can do all of your baking for a week or more, or bake for a whole huge group of people, which is really pretty amazing.
Baking Sequence
One of the keys to effectively using your oven is figuring out what order to bake things in so that you can maximize the oven and bake things in sequence. I have done several “baking days” where we fire the oven in the morning, begin baking around lunch, and literally bake into the evening–it is wonderful to have so much amazing food coming out of the oven, which can then be frozen, shared with others, or done as a larger part of a high day or feast celebration.
The key is to plan out your baking sequence based on the natural decline of heat in your oven. That is, you can plan for what you are cooking based on how long the oven holds heat if you’ve created your ring of coals, and also if you are keeping your baking door on or off.
I will offer a sample baking sequence based on the level of heat.
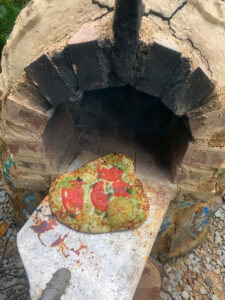
650-900 degrees (will maintain about 45-60 min) – Pizzas and flatbreads (up to 10-15 12″ pizzas). Pizzas/flatbreads bake in 2-3 minutes at 900 and about 5-7 minutes at 650-700. Thus, the longer you are baking pizzas, the longer it takes to bake one–but I can bake about 12-14 before my oven slows down. Keep oven door on at all times you are not putting something in or taking something out of the oven–this ensures highest heat.
500 – 650 degrees (will maintain about 45-120 min) – Squash, halved with seeds removed; other vegetables for roasting. High-heat roasting is really amazing and I never experienced it before the oven (cause my conventional oven doesn’t go above 500). It creates a caramelization and flavor that is outstanding.
400 – 500 degrees (will maintan about 90 – 120 min) – Casserole or Quiche: Macaroni and cheese, meats that want high heat roasting, dutch oven with stew inside, etc. Roasted vegetables.
300-400 degrees (will maintain for about 2-3 hours with door closed) – Bread, muffins, cookies, pretty much anything at this temperature. You could even put a turkey, roast, or ham and roast it for a few hours!
200-300 degrees (will maintain at least 5 hours with door closed) -low and slow foods. Anything that wants to be cooked low and slow, like baby back ribs, country-style ribs, or other meats wanting a low and slow baking time (you could even let something go overnight!). Various low-cooking stews, anything you could cook in a crockpot.
You will want to plan and prepare your food in advance–ideally with help for this much baking! And of course, you can skip parts of the sequence and just wait till the oven cools down to add whatever it is you want to add. The fastest way of doing that is just to keep the door off and let the heat radiate out.
The trickiest thing for me is if you want to bake bread, you need to time it so the bread is ready to go in when the oven is at the right temperature. Cause otherwise, you will get bread that looks like this–cooked probably 100 degrees to high. The bread was good, but it would have been better at an appropriate temperature.
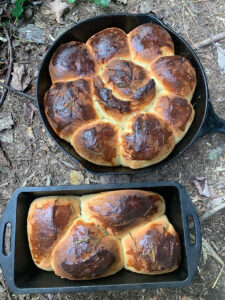
Bread cooked at an appropriate temperature (350) looks like it should!
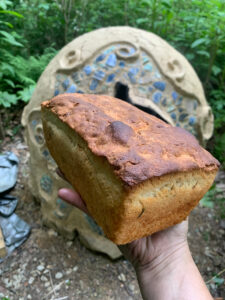
A final note about temperature and baking–typically the oven is 75-150 degrees hotter if you keep the door shut. So if you had the door open to cool the oven down, and your thermometer says 400, it might be 450 when you have the door shut for 10 min. Keep that in mind as you are planning out your baking sequence.
Tips for Cooking Pizzas and Flatbreads
Some special considerations are needed to cook pizzas and flatbreads in your oven. I will also say that you will want to practice this before you invite your whole family over to have pizza.
First, if you are making more than a few pizzas, you will need help. Typically, three people are a good number to make 12-15 pizzas for a crowd. The group gets about 5 pizzas prepared in advance as the oven is firing, then the coals are pulled, the coal ring made, and the hearth wiped down briefly with a wet cloth (see above) in preparation for baking. Then, one person is the primary baker. They put the door on and off and use the pizza peel to add pizzas and take them out. The second person keeps making pizzas, and a third can run the pizzas to wherever they are going to be and cut the pizzas (pizzas come out every 3 – 4 minutes at first, so this is a serious job!). Usually, whoever is left can eat the pizzas as they come out!
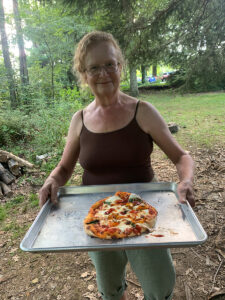
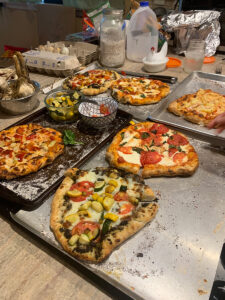
I like to make my dough the night before and keep it in the fridge. I usually also prepare all ingredients the night before. We put up a folding table near the earth oven and start making our pizzas, spreading them out on trays that have no sides and wooden cutting boards, making it easier to get them onto the peel and into the oven.
An absolutely necessary thing for pizzas is cornmeal — it needs to be placed liberally on the bottom of your pizzas. You are sliding the pizzas right onto the pizza peel and then right into the oven, baking them directly on the firebricks in the hearth. Make sure they slide on any pan or wooden board you put them on and do not stick. This is one of the hardest things–getting the pizza onto the peel and then into the oven (it is easier to get it out of the oven after it has cooked). If the pizza sticks, it won’t come off the peel properly. You can lose ingredients or have a disaster. Hence the cornmeal.
We have about 4 baking trays with no sides + a few large cutting boards–we make the pizzas, then we make sure they have a lot of cornmeal on the bottom. One or two people work to slide the pizza onto the peel, then the baker slides it directly into the oven, baking the pizza right there on the bottom of the oven. We keep the door shut in between pizzas so that the heat stays inside. Wait 2-3 min, check and then pull out your pizza (again shutting the door) in between.
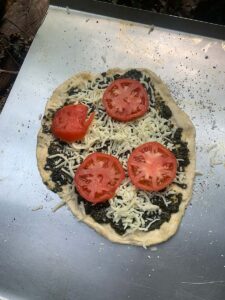
Then you just keep adding new pizzas to the oven. I think it’s fun when you have a group of people and everyone gets a chance to make their own pizza. I have also found that if you keep the pizzas thin and the toppings/cheese moderate (don’t pile it too high), it cooks better due to the high heat. We love using fresh ingredients from our garden, and especially, making some basil pesto pizzas and leek scape pesto pizzas from our garden.

Finally, I will share that there is skill required to use a pizza peel, so expect your first few pizzas to have some challenges until you get the hang of it. Use short, quick motions to slide the pizzas on and off.
The Smell and Heat of the Oven
I really don’t understand why nobody talks about the incredible smell of an earth oven when it is baking–this is my very favorite thing about the oven! I had some of my international students over last month–and we made about 12 pizzas in 45 minutes and also enjoyed the potluck foods they brought. Many of them shared that they have ovens like these in their home countries in Africa and the Middle East. I asked them if they could smell the top my oven–and they laughed and sniffed the top of it. And yes, they said, that is the smell of an earth oven. So anywhere you make an oven like this in the world, be prepared for some amazing smells!
The oven smells like clay and baking bread and so many other good things. I’ve never smelled anything like it, but it is now my favorite smell on the planet. It’s so powerful, that people will gather around the oven, lean against it to feel the warmth, and then just take in the smell.

On cold days, after the oven has been baking for a few hours, you can also experience the gentle heat radiating through the cob. It warms you in a way that our electric and gas heaters never could.
The Food is Really, Really Good
Once you understand proper baking times and have your baking sequence nailed down, you can produce some of the most delicious food you have ever eaten. Take this Macaroni and Cheese, which was part of my most recent baking sequence for the Fall Equinox in September. I’ve made this same recipe literally hundreds of times in my home oven. But the one that came out of the earth oven was so delicious and special. It has a more brown and delicious crust, brown and flavorful.

The oven is moist, especially with a good baking door. This also means you can produce some of the most delicious breads you have ever eaten.

Feast and Community
We’ve had the pleasure of using the oven when we have guests. You have to build your confidence in baking in the oven and understanding the temperatures, firing times, and sequence, but once you do, it is a wonderful way to build community and invite people into the process. Invite your friends, make an afternoon/evening of it, and everyone will gather around your wonderful hearth!
I hope you have enjoyed this journey into baking in an earth oven. It is certainly a skill that takes time to master, but I think it is a wonderful way to be reconnected with working with the land to help provide for your own needs, learning more ancestral ways of cooking, and slowing down to enjoy a more rich and gratitude filled life.


[…] Earth Oven 101: Firing and Baking in Earth Oven […]
Such a great and most helpful article. Thank you We have a similar oven that cooks up some fine vitels
Awesome! Would love to hear more about your experiences. These kinds of ovens are very few and far between; I’ve only ever seen three of them and the other two were at ecovillages/sustainable living centers.
I don’t have earth oven experiences to share, but a friend of ours has a wood-fired brick oven that works pretty much the same way. He has pizza parties where he provides the dough, sauce and cheese, and we all bring toppings. It turns out that morels, chanterelles, and black trumpets are brilliant on pizza.
Ohhh yes, they would be! That sounds amazing, Karen! 🙂
[…] Earth Oven 101: Firing and Baking in an Earth Oven – The Druids Garden […]
[…] Earth Oven 101: Firing and Baking in an Earth Oven – The Druids Garden […]