

In many sacred spaces throughout the world, we see the labyrinth. It is reflected in the spiral, the pattern in nature that repeats often, and asks us to engage. It offers us the ability to slow down, to wind around, to wind things up–or unwind them as we walk through and out. I have done many a ritual in a labyrinth at Samhuinn: one of my favorites is a simple walk. This is a lovely ritual for this time of year, as the wheel turns and the days grow darker. A labyrinth of lights, in particular, is a nice way to connect with the energy of this season. In this post, I’ll share how to set up a labyrinth for Samhuinn and how to use the labyrinth as a ritual activity for this time of the year.
True to the energy of this season, this past weekend, I was asked to lead the construction of a labyrinth at our local UU Church for a harvest festival. I think every druid should have the opportunity to set stones, put in a stone circle, and set up a labyrinth from time to time, so I jumped at the opportunity. I wanted to share our process for doing so, as it can help you build your own labyrinth: I found that there is not a lot of good information on how to simply and effectively construct a labyrinth, so I hope these instructions are of some use! Our labyrinth took only one hour to set up with four people working–if you were doing it on your own, it would likely take several hours.
Walking and Wondering, Meandering and Pondering
Before getting into the labyrinth instructions and how to use them in ritual, I want to share a few thoughts about meandering, walking, wondering, and pondering. There is a lot of value in setting aside time simple to wander, to ponder, to think, to reflect, and to meander. We don’t do enough of this; our fast-paced culture asks us to pack in so much and always be stimulated with something beyond ourselves. One of the values of the labyrinth, I believe, is that it physically creates a space for doing just this. On its most basic level, we walk a physical sacred pattern, and it opens up time simply to move, to clear our minds, or to ruminate about something. To allow what is within to rise to the surface for consideration. At the end of this post, I’ll talk about some more intentional rituals you can do using labyrinths at Samhuinn, however, using a labyrinth just to slow down and reflect is a powerful activity in and of itself.
Materials and Planning
Materials Needed for a Labyrinth of Lights:
- 350 tealights; you could use other things as well, but tea lights are movable and easy to use. We used the little battery-operated ones due to the weather issues–they can be reused over and over again.
- Optional: mason jars, paper bags, or something to set the tea lights into. Mason jars with a bit of sand work really well–even if you use them only for the gateways and along the outer edge.
- A 50′ length of hose (rope will also work, but the hose is a little better in windy conditions)
- Several yardsticks
- At least one tape measure
- Small flags (like the kind that mark gas lines) to setup your initial grid
- Plans/Designs (you can print them out from below).
Size of the Labyrinth: This process can be done with 2′ or 2.5′ paths; the one we made had 2′ paths and measured around 36′ feet across. 2′ paths is a cozy walk that is doable for most people. 2.5′ foot paths give more space, however, it requires many more lights (probably you would need 450 for this design). 2.5′ paths are a little harder to manage in terms of measuring, but still doable. The assumption is that you can space a light every 1′ or so,
Review the plans before beginning. If you are setting up the labyrinth with anyone else, it is helpful to review the plans or send them out in advance. I would also suggest, if this is your first time setting up a labyrinth, you get some grid paper and draw it out a few times using these instructions. It can really help you envision it and enact it on a larger scale.
The Process
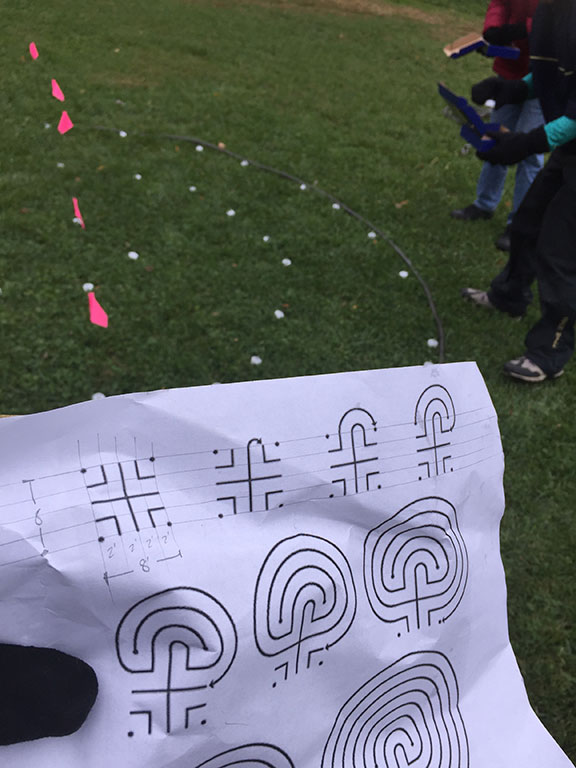
The following is a graphic that shows the full process. I used different colored markers to show each step. I will refer back to the graphic in the instructions and will also include photographs (you can click on it for a full-size image).

1. Select a location. You should choose a location that is flat and has at least 40′ of space on all sides. You can check your circumference by having one person stand in the center and measure out 20 feet with your tape measure. The person on the outer edge should walk in a circle, making sure you have the 20 feet clear on all sides. Do this first to make sure you have enough space for your labyrinth. If you don’t have the space, move till you can get the clear space for the labyrinth.
2. Mark your center point. You will want to mark your center point in some way–we used three flags for our center point. In the graphic above, the center point is the center of the red cross in the first image at the top right.
3. Create an 8′ x 8′ grid, with flags at each 2′ interval. The way we made our grid was to start at the center point and measure out the eight feet, placing our center point at the 4′ mark and then placing flags at 0′, 2′, 4′ (center), 6′, and 8′. This gave us one line of flags. We then measured out again, laying measuring sticks along the flags, marking out the 2′ mark, and then using the tape measure to measure out 8′ again. Eventually, you’ll end up with a grid.


4. Set the first set of lights. The first set of lights forms a cross in the middle, four corners, and the four points. This will allow us to map out the rest of the labyrinth. See the cross and corners in red in the first image.

5. Create the first arc. This first tiny arc sets up the rest of the labyrinth. The tiny arc is shown in orange in my first image.
6. Create the second and subsequent arcs. The second arc (and subsequent arcs) all flow from the first. Here is a graphic that shows all of the arcs in order. You basically make one arc after another and use the previous arc to make sure your paths stay at 2 feet.

To make our arcs, we used a garden hose and then checked our measurements after setting the hose. This is where having multiple people can really help!


7. Check your plans often. As you are working, check your plans, keeping track of what arc you are on. After each arc, make sure you set your lights about 1′ apart (or less if you are using more lights).
8. Mark your entrances and edges clearly. We decided to leave the hose in place for our last circuit; that way, kids running and such wouldn’t knock it over. We also clearly marked our pathway into the labyrinth so that folks coming into it could see clearly where to start.

9. Encourage people to walk the labyrinth! Of course, a labyrinth is meant to be walked. It took us about 10 minutes with 3-4 people to turn on the lights and turn them off at the end of the night.

Samhuinn Celebration with the Labyrinth
There are many ways to walk a labyrinth and ways to use it for your own spiritual practices. I’ll share a few ritual ideas here–and please feel free to share more of your own insights in the comments!
One of the key features of the labyrinth is that you have an opportunity to “let go” and also to “raise up” as you go inward and outward. The labyrinth that I posted above starts with a clockwise motion, but you shift between clockwise and counter-clockwise as you go through. Different designs may offer other perspectives–winding or unwinding spirals, for example. Given this “balanced” perspective, however, you can use the labyrinth to “unwind” certain things, to “wind up” certain things, or to do a bit of both. Samhuinn is viewed by many as the new year, so I like to use an “out with the old, in with the new” approach to the ritual.
Walking the Labyrinth: Walking the labyrinth should not be a rushed activity. It is a form of walking meditation, where we work to have an altered or elevated state of consciousness as we go deeper within the labyrinth. I start with three deep breaths (or more) outside of the labyrinth to mentally prepare me for the work ahead. If I have intentions (I don’t always), I state them also aloud before entering the labyrinth itself. Then you can choose one of the following rituals/walks:

Setting a sacred space: I have done rituals that set up the sacred space around the outside of the labyrinth before proceeding inwards (I shared some photos about the snow labyrinth my grove created a few years ago at Imbolc, for example). In this ritual, we did a standard AODA grove opening, visiting each of the four quarters, and calling in the elements. One at a time, we went into the center of the snow labyrinth and laid down there for a time, in silence. After a while, we slowly walked back out, having let go of many things, and working now to integrate and heal. We closed the grove and enjoyed a feast and fire afterward!
Out with the old, in with the new walk. The most simple way to walk the labyrinth as a magical activity is thus: On the walk-in, you let go of whatever you need to let go of. Each step or each circuit can have you letting go of various things: this can be a type of discursive meditation, the physical journey of your feet takes you deeper within, allowing you to let go as you walk your way deeper inward. The physical act of letting go might involve breathing it out, grounding it (barefoot), or simply saying “I release you.” This is a very, very powerful activity within the space of the labyrinth. Its also a very powerful activity when done with others. When you reach the center, you spend time in meditation. When you walk out, you re-energize and find your strength and grounding.
The Ancestor Walk. Another good way to use a labyrinth at Samhuinn in particular is to do an ancestor walk. Open up the sacred space, light up the labyrinth, and ask the ancestors to join you for the walk. When I have done this, sometimes, I have walked and communed with a single ancestor; other times, each circuit has a new ancestor who wishes to connect with me. I combine this with an ancestor altar at the center of the labyrinth and/or an ancestor tea.
The Ancestor Tea: A variant of the ancestor walk is the ancestor tea. Prior to the ritual, boil up some water and place it in a tea pot with herbs; place it, along with something to sit on and some candles, at the center of the labyrinth. Then, open your sacred space. Then, walk the labyrinth, making sure to let everything go and come into the ritual space as part of the walk. When you get to the center, you pour two cups of tea–one for yourself and one for the ancestor(s) you wish to commune with. The tea goes on as long as necessary until all of those who you have wanted to honor are present and have had tea. Then, you walk back out and close the space. The tea that I typically use for this is a mugwort tea (which is very bitter on its own); usually I combine this with hawthorn, sage, or lavender.

These are just three of many ways that you can use a labyrinth for a Samhuinn celebration this season. You can make these indoors or out (although I really love being outside this time of year, as the leaves settle to the ground and the cold winds blow!) I hope everyone has a blessed Samhuinn and blessings upon the coming season!


Impressive!
Thank you so much 🙂
And your diagram rocks. It reminds me of the way I learned to draw Celtic knotwork. 🙂 George Bain and his dots, connecting the lines where they intersect, under and over and under… 🙂 His son later published a book that used mathematics to help artists do the knots, but it made absolutely no sense to me. I prefer the elder’s method. I still have my worn copy. 🙂
I have seen that book, but I don’t currently own a copy of it. Its a good reminder to pick it up. I have a few different ones, and my dyslexic mind sometimes gets lost. I’d like a simpler method :).
Reblogged this on Rattiesforeverworldpresscom.
Thank you for the reblog!
That came out great! Love the multicolored diagram.
Thanks Cat! And thanks for your help 🙂
This is awesome. Thanks for all the details!
You are most welcome, Lizzy!
Reblogged this on ravenhawks' magazine and commented:
Thanks for sharing it looks awesome! Samhain Blessing to you.
A Samhain blessing to you as well! Thank you! 🙂
Hi Dana,
The veils between the worlds are very thin this time of the year. Thank you for this teaching. It will help me to honour my dead.
Yours under the red cedars,
Max
Max,
Indeed, the veils are thin right now. It is a charged time. I’m glad this will help you with your own ceremonies! Blessings!