
An earth oven is an oven made of cob (a mixture of clay, sand, and straw) with insulating features (firebricks, bottles). It is an extremely efficient and sustainable method of doing any baking you might need to do. One firing of your earth oven can allow you to bake different things for hours (pizzas, bread, casseroles, vegetables, etc), and it takes only a small amount of wood to heat. We fire ours by simply picking up deadfall sticks and branches, cutting them up, and that’s all we need. An Earth Oven is fully sustainable to build and cook with, and you can locally source literally all of the materials for the oven (and in fact, minus fire bricks, you can probably harvest everything you need from your own land or the land around you).

An Earth Oven allows you to connect deeply with the earth itself, encouraging you to slow down, root, and ground. It is certainly a nice example of “slow time” and “slow food”, as the oven takes a few hours to fire before you can bake in it, and it requires some learning. With that said, the rewards of this approach way outweigh any challenges you might experience as you learn and grow.
The other thing about your oven that is rarely discussed is that it is truly a sensory experience. Your earth oven will allow you to bake any number of delicious creations–and when you bake in it, the smell of the bread permeates the clay itself, and it has this incredible smell, unlike anything you’ve ever experienced. Even on cold days, being near your oven will keep you warm (and your oven will stay warm for literally hours–possibly all night). It is just such a wonderful thing.
Earth ovens are a wonderful kind of “hearthspace” where we can cook foods for ourselves and loved ones, use natural materials to build from the land and honor the land, and create a very sustainable and low-input cooking method that is a joy to make and a joy to bake in. In this new series, I’ll offer full details about how to build an earth oven step by step! This series will have three posts–today’s post covers materials, preparing the foundation, preparing the base, and creating the dome. Next week’s post will explore insulating the oven and finishing the oven through a mosaic/cob, finish plaster, and options for doors. The final post will explore how to cook in your earth oven and some tips and tricks I’ve learned in my first year with the earth oven.
Preparation: Materials
In order to build your earth oven, you will need to prepare some materials and do some prep work. Earth ovens are not expensive to build–most of the investment is in your own time and labor.
Materials for building:

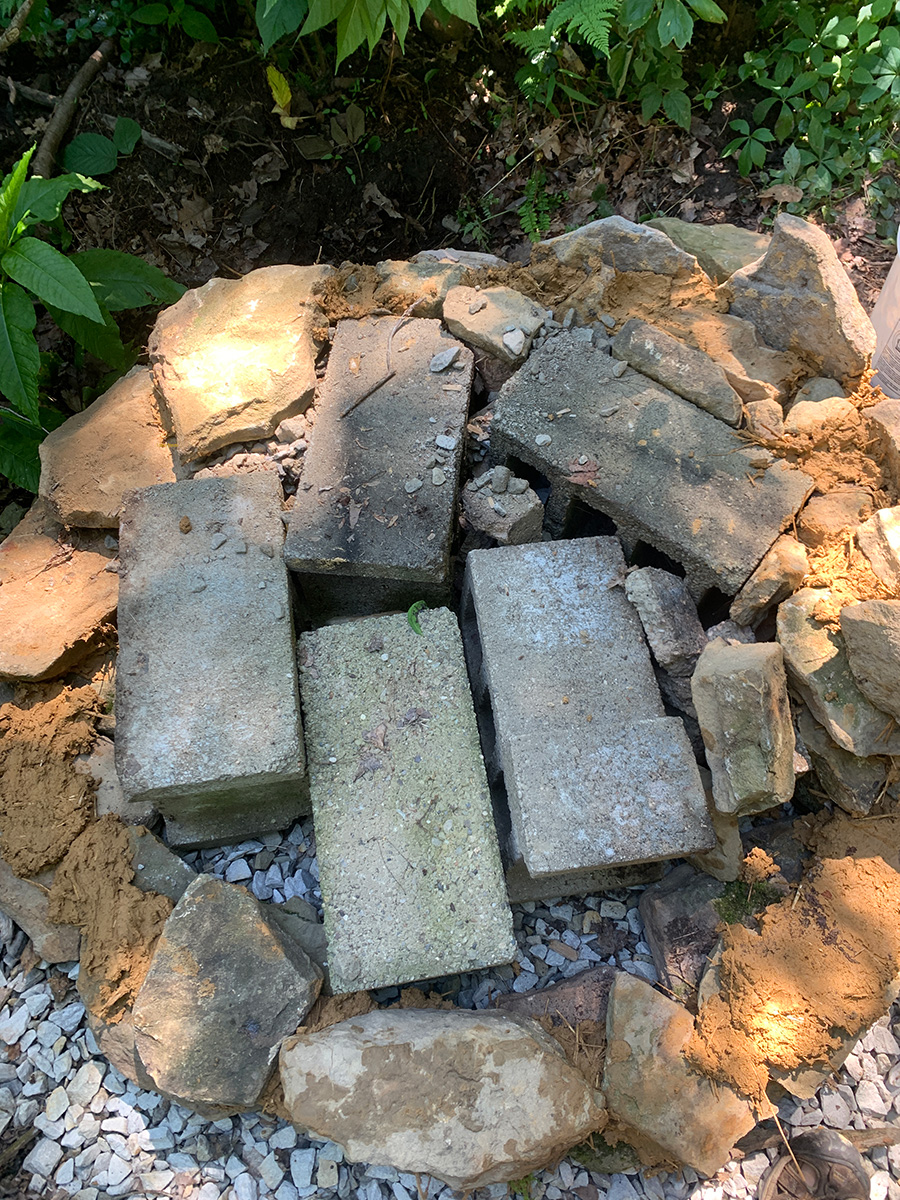
- Stone and urbanite: You will need some kind of base for your oven; most people use local stone or even urbanite for a strong foundation. Urbanite refers to waste materials like broken bricks, broken concrete blocks, etc. You can use urbanite to “fill” the inside of your base and create a stable foundation. I have also seen people build ovens on old large stumps or platforms.
- Subsoil / cob: First, you will need access to your subsoil (that’s the soil that is not full of organic matter, but the soil below it). You will need quite a bit of subsoil, so make sure you have easy access. Once you have access to the subsoil, you will want to do some soil testing (which I explain in the link) so that you can be sure you have good subsoil to work with. To access subsoil here, I found a tree that had gone down and uprooted itself–the roots and ground below it was full of all of the subsoil I needed.
- Straw: You will need a bale of straw for your cob. Straw adds strength, can provide insulation, and can help hold your structure together.
- Sharp sand. You may also need some sharp sand (known as builder’s sand) depending on what your cob tests reveal. You can get this from a landscape supply or building supply place.
- Sand: In addition to the sharp sand as an additive, you will need sand to build your sand dome.
- Newspaper: You will need 3-4 newspapers for your dome.
- Bottles: You will need at least 20 wine bottles for insulating your base. These can be foraged from recycling bins, saved by friends, or even found at local restaurants. Depending on your structure, you can also use smaller recycled bottles to help with insulation (I did this, but some people use only straw).
Tools for building:
- Wheelbarrow or cart: You need something to move materials around your site.
- Shovel: A shovel for digging subsoil and moving cob around.
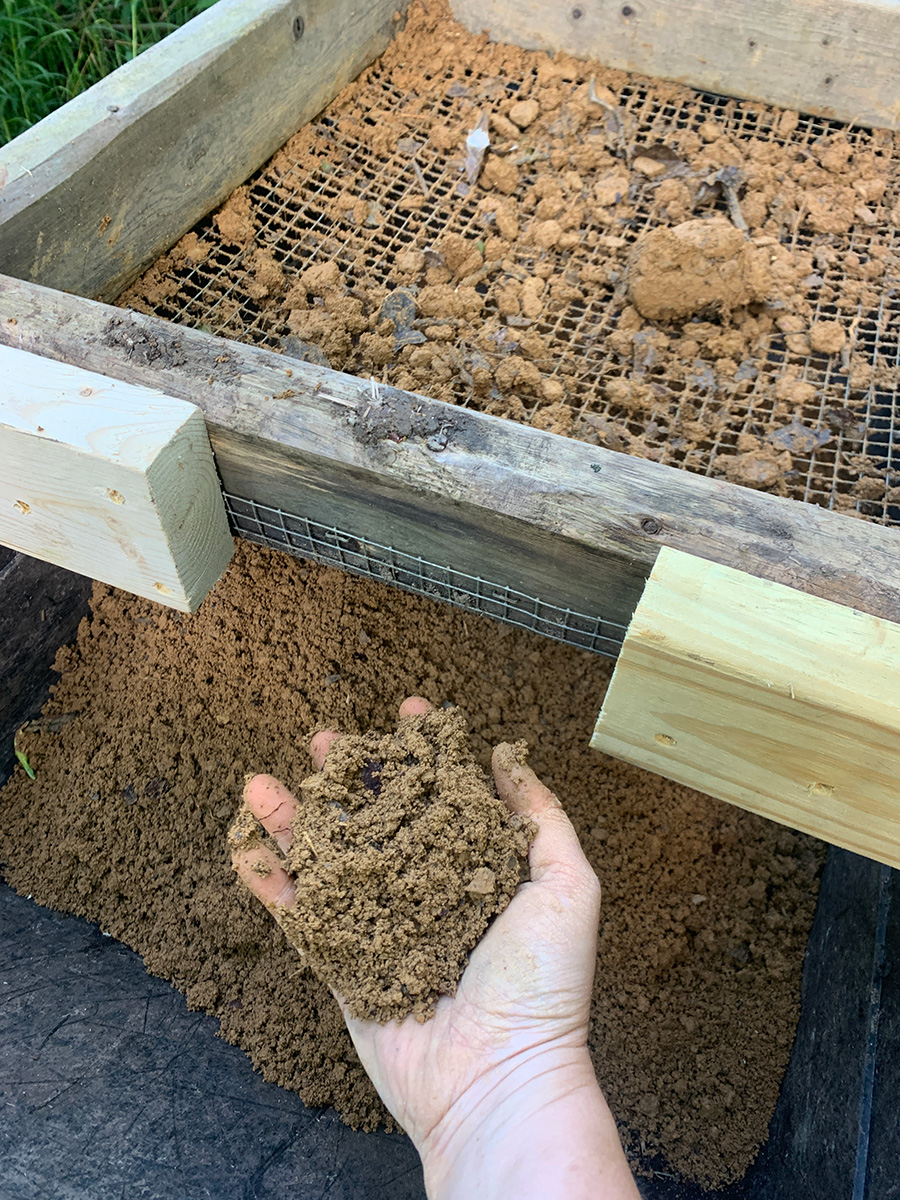
- Screen. To prepare your subsoil, you will need to screen it of larger items (stones, debris, etc). For this, you can build a simple soil screener (this also works great for screening compost!). Make your soil screener large enough that it will sit over your wheelbarrow or cart that you will be using to move it. I built mine with scrap lumber and 1/2″ hardware cloth.
- 5-gallon buckets: A few buckets are super helpful. They can move the cob from where you mix it to your oven. You can fill some with water to rinse your feet.
- Tarps: A small tarp will allow you to mix your cob. You might want several, especially if you are doing the work yourself (I found that when I was doing the work myself, I would gather materials – screen cob, gather rocks, etc, on one day and then build on the next, so tarps were able to keep my cob screened and protect it from the elements). You also will need a tarp to cover your cob oven until you can have a structure built for it.


Other Tools and Materials:
- Pizza peel (I created one from an old aluminum pan and an old rake handle)
- Firing door and baking doors (more on this in an upcoming post)
- Shelter structure
We’ll cover these last three in an upcoming post.
Preparation: Oven Size
You can decide how large of an earth oven you want to build. There are many measurements in the Build Your Own Earth Oven which I used as a reference. Here’s a simple diagram of the oven and the dimensions that I used. These allow you to figure out how large of a foundation and base you need and will determine the overall structure.
For example, to get good airflow, I created an oven that was 27″ in diameter, which included an 18″ high dome. Your door should be 63% the height of the oven or 11.5″ high.
Your oven can be larger or smaller, of course, depending on your needs.
Preparation: Selecting a site
I think it is really important to spend time selecting the right space. Your space needs to drain well (especially if you are in a temperate climate that has snow/ice). Your space also needs to be protected from the elements as cob is a natural material that will weather quickly if left without protection. Your space should also align with your landscape (see setting intentions with nature).
Your oven should be somewhere easily accessible. You will need to tend a fire every 20-30 minutes for four hours in order to have an earth oven hot enough for pizzas or other baked goods. Thus, you don’t want to put it so far away from your house that it’s hard to tend the fire (but not close enough to cause any insurance issues!)
For my earth oven, I decided to build a little nook on the edge of the property that leads into the forest. That provided both shelter from the elements (and it will get a permanent roof this year) as well as being pretty close to the house for tending the fire in the oven.
Preparation: Clearing and Foundation
Building your earth oven begins with a good foundation. Any cob structure should have “a good hat and feet”, and the foundation is the “feet” part of that equation. Here is step by step how I built my foundation.
I began by measuring out my foundation – 46″ based on the height of my oven. Then I removed all of the plant material in a respectful and reverent way (as described in this post); I worked to replant any material that needed to be replanted, etc.
After clearing, I dug down 1.5 feet and added a gravel base for drainage. It’s hard to tell from these photos, but we are on a slight incline, so I made a drainage area to the left of what you see here.

Preparing and Mixing Cob
The next step is to screen and create your cob. I went to my site with my wheelbarrow and put a 5-gallon bucket at a time in my screen. Using a rock, I worked the cob through the screen. (More details about making cob here).
After that, I moved it to my building site and prepared to mix the cob.

To mix the cob, you will need an old tarp, two or more buckets of water (I like to use warm water!), and some happy feet. First create a well in the center of your cob and, just like making noodles or dough by hand, then start mixing the cob with your feet. You can use the tarp to flip the cob and keep working it.
For building, you will want to also add handfuls of straw (I cut the straw up so it’s a little shorter) and work that in. Ideally, you want something with a good consistency that sticks together and isn’t too wet and crumbly. You can add more water or more soil as you mix. I have more detailed instructions on mixing cob in an earlier post.

You can also get others to help you–friends, children, or even geese.

Building your base
In addition to the cob, you will also need something to build your base up that is fireproof and stable–rock or brick is a very good choice for you. For my foundation, I used a mixture of cob along with locally foraged stones and urbanite (old concrete bricks that were broken and strewn about the property.) A good foundation and good base are critical to the success of your oven. You want to build your base high enough that it’s comfortable for you to fire and use the oven. I kept mine pretty low cause I like to sit on the ground when I work!
I began by mapping out a circle (using a string and some chalk) and building the outside of the circle up using the cob as a mortar. On the inside, I added my urbanite brick pieces and filled in all holes with smaller stones and cob. Here’s the first layer.
As I worked, I continued to build up the stones on the outside. Since I also planned some decoration, I had stones I had already added mosaic to that I wanted to include. These pieces were made of mosaic materials leftover from both from doing my mosaic bathtub a few years ago + broken pottery and plates that I save.

It took me two building sessions, but the base continued to grow.

You can see that I’m building up the inside of the base as I build up the outside of the base.
At this stage, I have the base at the top level and as high as I want it. You can see I am using a piece of wood and a level to check to make sure everything is level as I work. The next step is to add the insulation layer to the base. The insulation layer is made up of a straw-rich cob combined with wine bottles. Bottles offer insulation, which keeps heat from getting absorbed by the stone below. Insulation is really an important feature of these ovens–investing the time to do insulation will allow your oven to be used in colder temperatures, hold heat longer, and heat up sooner (meaning you use less wood to make that happen).
I started this with a thick layer of straw-rich cob. Straw itself is insulating as it traps small amounts of air in it as it is worked into the cob.
Next, I layered the bottles with more cob in between each to create a solid foundation.

After the bottle layer, I used the board to smooth out the layer and wait for the base to dry for about a week before continuing.

Except that we have powerful raccoon activity, and that night, someone tried to dig up my base to see what was in the bottles!

I repaired the cob and then started putting a tarp over it at night to deter the raccoons until my base was a bit drier.
Laying your firebrick

To start your hearth, you want to put down a fresh layer of cob so that you can set the bricks in carefully. Slide the bricks against each other and make everything perfectly level. To make an oven that is 16″ inside (which is enough to cook a few breads and two small pizzas, perfect for small groups or families) you can use fifteen firebricks in the following pattern (the two firebricks in the back were redundant and I removed them later).
Notice here that I’m also planning a lip to pull my pizzas in and out of the oven.

Using a string, I made a circle to show me where to build the sand dome for the oven itself. Now I’m ready to build the actual oven.
Creating Your Sand Dome
I think the most labor-intensive part of this entire process is building the dome and cobbing the dome. Everything else can be done in stages, but this really has to be done all at once. This part is a great time to invite some friends or family to help you if you are doing this on your own.
Start by mixing 1-2 large batches of cob (with straw reinforcement) and tarping that while you build the dome.
To build the dome, you will want a ruler (to test the height of the dome), newspaper, and a few wheelbarrows of sand. I mixed my sand right in the wheelbarrow and got it to a consistency where it would build up well.


So then, start building the dome, using the guide you drew. I stuck a metal art ruler down the center of the dome so I would know exactly how tall it was (with a goal of 18″ tall).
As you get further along, you can take a small board and smooth and shape the sand dome. PUll out the ruler, and you are ready to build!

Go head and coat the whole sand dome with a layer of thick wet newspaper (this creates a barrier both to keep the cob from sticking to the sand and gives you a sense of where to dig out later.
Now, you want at least a 2-3″ thick layer of cob all around the dome. You dont’ want to press the cob into the dome, but rather, shape the walls downward with your hands.
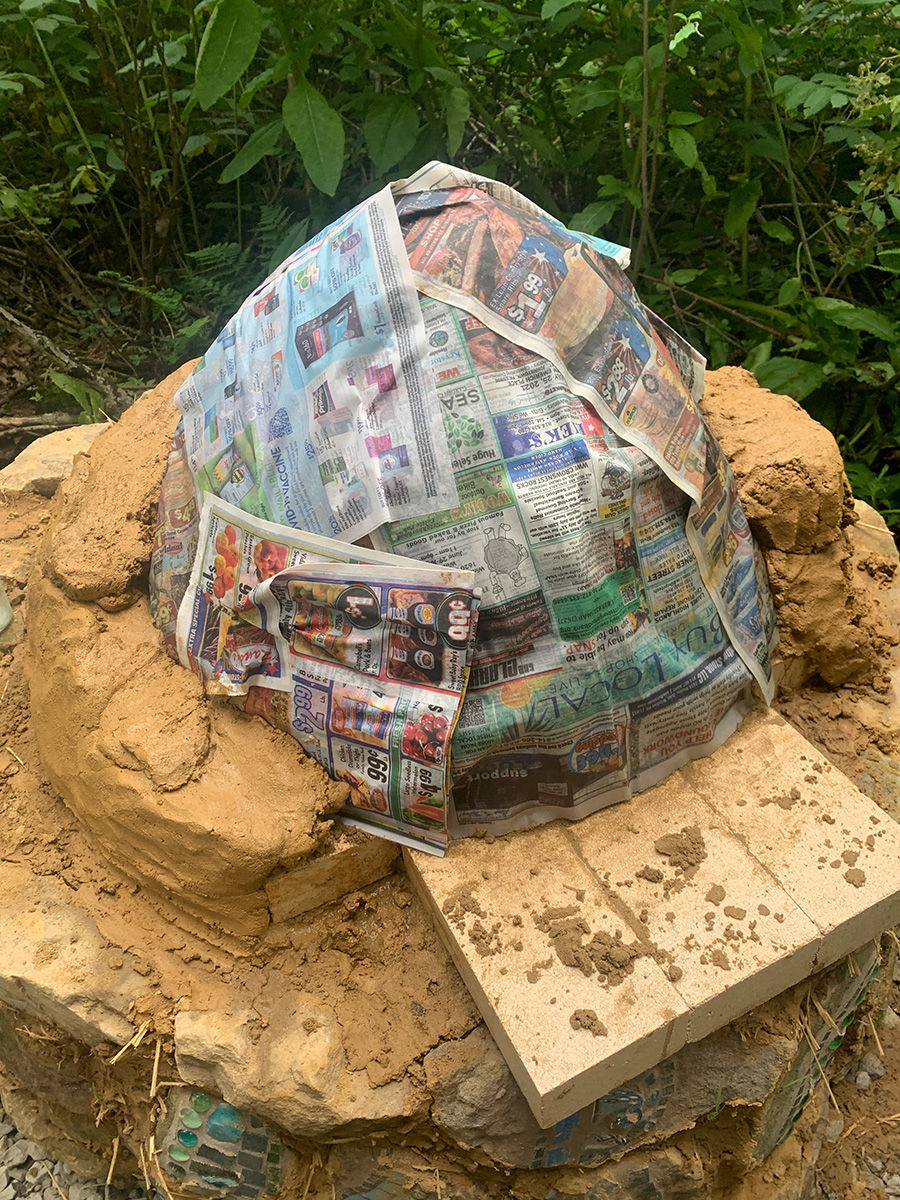
Keep working your way up.
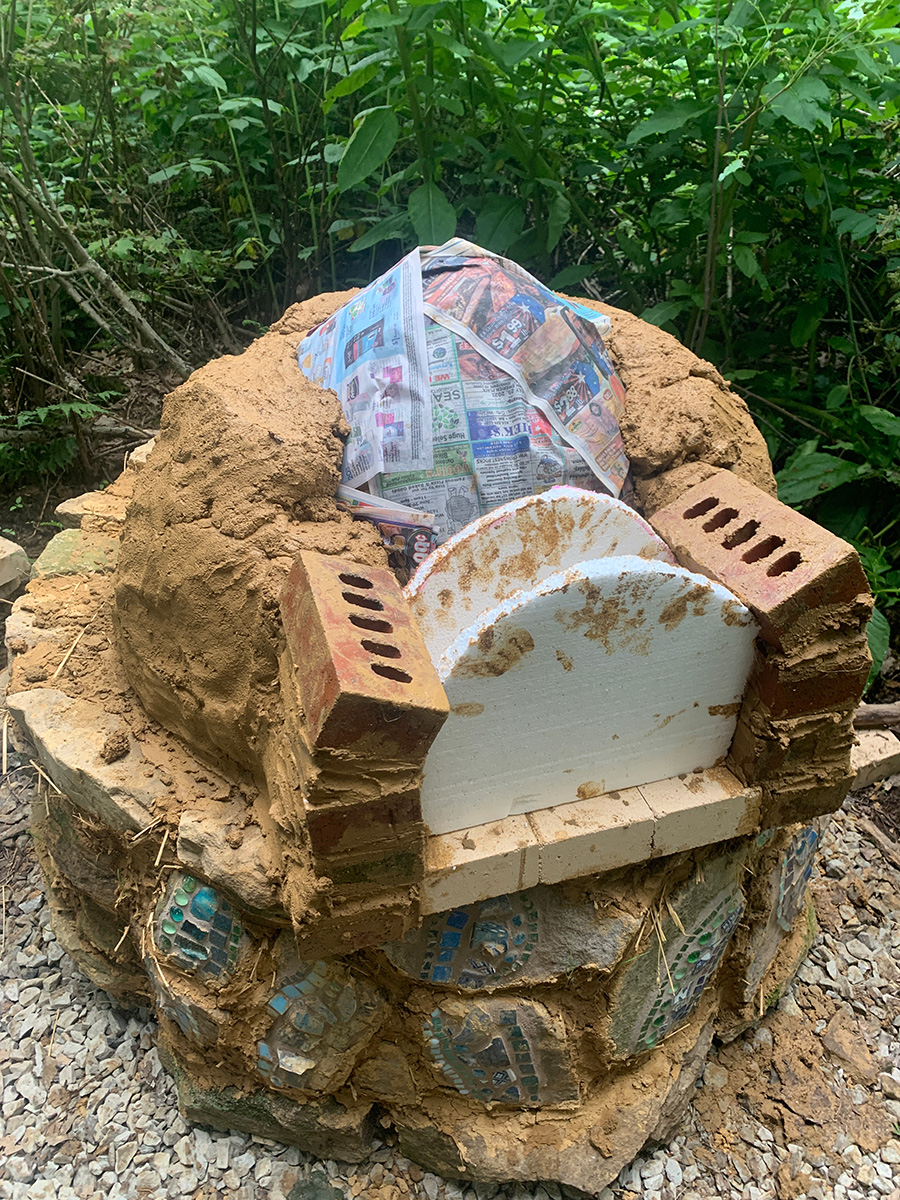
A lot of ovens have some kind of door area. We used old bricks to build our door area (planned out in advanced). To keep the door balanced, we added two pieces of packing foam that we cut to the right size. These were later pulled out when the structure was dry.

The arch proved a bit tricky–we layered sticks in between the sand dome and the foam arches and that provided enough stability until the oven has dried.
Here is our completed first layer of the cob oven.

At this point, you will want to give your oven some time to dry. We put a little pavilion over it and allowed the summer sun to dry it out.
Digging out the oven
The next step is to dig out your oven and light a few small fires to help dry out the inside of the oven. You can just use your hands, a small trowel, or a stick. You want to be careful as you dig out so that you are not digging into the cob itself (hence why the newspaper barrier is so useful).

I used my shovel to remove the bulk of the sand and then got in there with my hands as I got closer to the walls. I let the oven sit another week after I pulled out the sand, and then I lit a small fire for a few days to get the inside dried out. Here’s the very first fire.

Alright! That’s over half of the oven build. In my next post, I’ll show how I added layers of insulation, a final plaster, and also decorated it with more mosaic pieces that were salvaged from broken pottery.

One final thing I want to say now is this is an incredibly good way to connect with the element of earth. There is nothing more grounding than having your feet and hands directly in the soil, shaping it, honoring it, and getting to know it. I really enjoyed my time building this and felt incredibly grounded afterward!
News and Updates
- My book Sacred Actions: Living the Wheel of the Year through Earth-Centered Spiritual Practices has one the Ben Franklin Award (Silver) in the Mind, Body, Spirit Category! I’m so excited. For information on how to purchase Sacred Actions, please visit this page.
- We still have 5 weeks to go on the Crowdfunding campaign for the TreeLore Oracle and Magical Compendium of Sacred Trees. If you haven’t done so already, please check it out here!


[…] Building an Earth Oven Part I: Foundation, Dome, and Structure — The Druids Garden […]
[…] Building an Earth Oven Part I: Foundation, Dome, and Structure […]
I’m full of admiration Dana…that oven is amazing. You must be so proud!
Aw, thank you! I learned a lot, that’s for sure :). It was also very much a good earthing experience–at a time when I needed it! I would build one again for the energetic work and experience alone.