
In my quest for sustainable art supplies and things for daily living, I’m always experimenting with ways of replacing commercially produced materials with homemade ones. And so, my papermaking quest continues. For earlier posts on papermaking, you can read about the basic process for recycled paper here and making cattail head paper here.
I had a friend recently ask me about making handmade paper from the cattail leaves in winter. I was skeptical because of their toughness (and my lack of a Hollander blender, which is a industrial-strength blender that is a papermaker’s dream for preparing tough fibers) but I thought I’d give it a go and post the results here. I’m going to walk you through my process and talk about what worked and the things I would change. I will start by saying that making paper from any kind of natural material is a lengthy process, and the tougher the fibers, the more difficult the process. This is why I posted about cattail seed/head fibers first–they are really simple compared to leaf fibers :).
The overall process of turning tough fibers into paper: For most plant materials, to create pulp, you have to break down the non-cellulose materials in the plant (usually through boiling in soda ash or lye). This is usually a lengthy process. If you are cooking fibers, you want an enamel or stainless steel pot–an aluminum pot will react with the Soda Ash or lye that you need to use to break down fibers. A typical cooking takes about 4 hours. Soda ash (Arm and Hammer Super Washing Soda) can be used in your home. It kind of stinks, but its not toxic. If you are breaking fibers down with lye (which is needed for some really tough fibers) then you will need to boil your pulp outside because lye is toxic and releases some toxic fumes. This is where having an outdoor rocket stove can be so useful! After you boil the fibers down, you will rinse them, beat them, and then rinse them again. At this stage, hopefully, you will have something resembling pulp! So this is the basic process that I used for the cattail leaf fibers, although, as I describe, each time you work with a new material it is a learning experience.
Harvesting Leaves: If you are a home papermaker and lack any equipment heavier than a typical home blender, you absolutely do not want to attempt anything with with tough stalk material (like stalk of phragmites or the stalk of the cattail). They are too tough and difficult for you to use. So I decided just to harvest the cattail leaves (many of which are brown and dead by my pond). I harvested enough for a test batch (and in this first photo, you’ll see that I also harvested some other reed things I don’t know the name of but I plan on trying to make paper from at a later point.) I will also say that if you are serious about making this paper, harvesting is the easiest part.

Soaking and Preparing Leaves for Cooking. I brought the leaves back inside, I pulled out any that were rotten or otherwise looked dark or partially broken down That left me with a bunch of leaves that I tore up and added to a pot of water to soak overnight. Here’s the first thing I would change–the fibers I ripped were WAY to long. I left them about 5″ long, thinking that they would break down further with beating and cooking. Uh, no, they don’t. So I would suggest taking scissors to them and chopping them up to 1″ and 1/2″ pieces. This will save you trouble later.

Cooking fibers. After a full 24 hour soak, I was ready to cook my fibers. I cooked them on high for 4 hours with a half a cup of soda ash (Super Washing Soda). It stunk up the house, but that’s how it goes when you are making paper :). Here is a shot of the fibers as they are cooking. The fibers will get less hard, and more pliable. They’ll also get a lot darker. Once the fibers cool, dump the water and rinse the fibers a few more times.

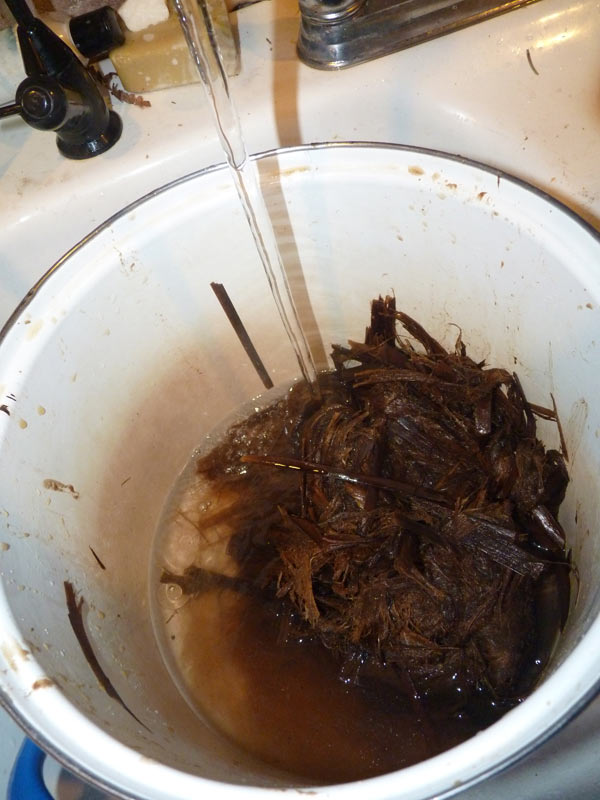
Beating fibers. After your fibers are cool, you can go ahead and beat them a bit. Cattail leaves have some stuff inside of them that isn’t good for paper (it makes things kind of sticky) so its always necessary to beat them after cooking them. I started with a little wooden mallet, but I quickly shifted to using my rubber boots and jumping on the whole stack because, hey, its cold outside in Michigan in December and that little mallet would have taken an hour. They spurt water too, so stomping them is best. This is really where you start to see the pump taking form.


Rinse fibers. At this point, I took my fibers back into the kitchen and rinsed them. I was done for the day, so I left them sit on the counter soaking in more water overnight.
Cutting fibers. Now, if I had a professional hollander blender, I could avoid the beating fibers and rinsing and cutting, and just stick the things in the hollander blender. But I don’t have one, so fiber prep is a lot of work. I found that my fibers were WAAAAYYY to long to make a good pulp, and there was no way a regular or immersion blender or household tabletop blender could handle them due to their length. This left one option: cutting them up. If you took my advice and cut them up earlier on, it would be easier than doing this at this stage. It might even be possible to blend them, which would be a really good thing. But here I go, cutting up my fibers!

Making the paper. At this stage, after about 6 hours of gathering, processing, cooking, beating, I have some pulp. Honestly, the pulp isn’t that great because its too fibrous and not too pulpy. I think if I had cooked it down in lye and cut it shorter, I would have had a better fiber. The lye breaks it down more than the soda ash. But I went with what I had. I pulled four sheets with just the cattail fiber (which didn’t couch well, but dried really interesting) using the methods I described in my earlier post. The fully cattail fiber paper doesn’t hold together well either–but that really has to do with the size of the fibers and the fact that I couldn’t get them any smaller. For half the batch, I decided to add some abaca fiber (commercially prepared) to make it more pulpy and that paper looks great. Here are some final photos.


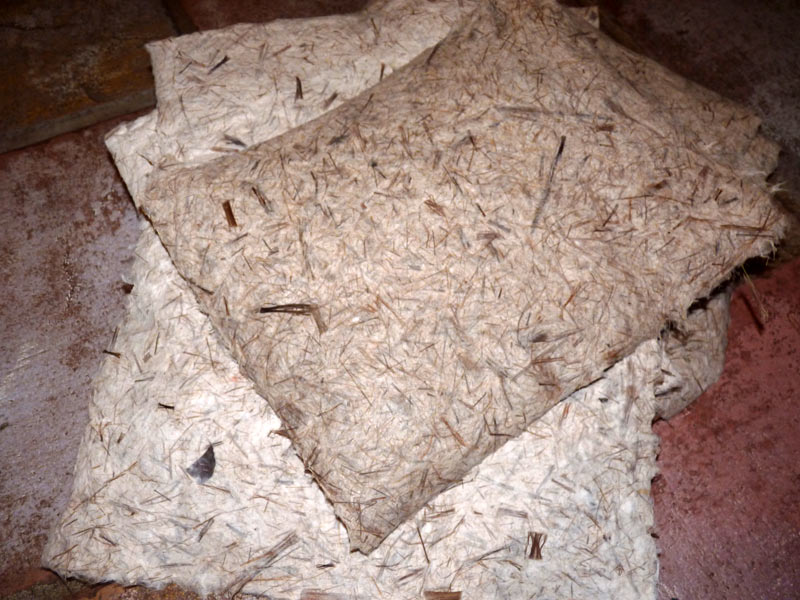
Closing thoughts: I think that cattail leaf fibers in the winter, when they are dry, represents a challenge for papermakers (especially if you aren’t going to blend the fibers with anything else). I would instead go with the cattail heads, which are much more straightforward and which you can get throughout the fall, winter, and spring. At the same time though, all the work was worth it because the final paper with abaca pulp is nice. The fully cattail leaf paper is a bit flimsy, but I can see using it in a mixed media project, but likely not on its own. The stuff that has abaca fibers holding it together is really, really nice and I could use it for all sorts of things.


During the cutting stage, could you use a meat grinder? Old meat grinders seem to show up frequently at garage sales and i have wondered if there is a use for them. Also, have you made any of your own ink? I tried a recipe for ink made from black walnut husks, and it worked really well. I (more or less) followed the directions from here: http://www.marktablerart.com/5.html
I don’t know if a meat grinder would work. It could. Its worth a try.
Yes, I do make my own inks! I haven’t posted about walnut yet, but I do have a post on berry inks (and there isn’t much difference between making walnut and the other berry inks): http://druidgarden.wordpress.com/2012/08/29/making-berry-inks-huckleberry-raspberry-blackberry-pokeberry-etc/
Thanks for posting!
Great post! I love the step-by-step details.
Hi Willowcrow,
http://wildplumstudio.com/blog/ Here are a few images from my papermaking experience, which you inspired. I haven’t been as dedicated to my blog these days, but will eventually post more since I seem to be on some kind of roll with the paper. I have a print business. I became aware of how toxic the paper industry is, and that was part of my motivation. In the end my experiments aren’t exactly using only natural ingredients, though. I started out with the best intentions, but to make the paper accept printer ink, I added acrylic, a petro-chemical, sigh… My studio has every kind of chemical, starting with heavy metals. Being an artist can be very toxic.
I’ve learned a lot though, and will try to find time to make a decent post. Gelatin is a good paper size with a long tradition, easy to acquire, natural, etc. Guar gum can be used as a binder. Adding paper and fabric helped hold the pulp together.
Crystal
Crystal,
Thanks for the info on the paper sizing–this is so helpful to know! I will do some experiments of my own and report back 🙂
What will happen if the water has overflow while cooking? Would the result change?
No, it wouldn’t change the result, but your stove might get pretty messy :).
try plating the cattail leaves then roll them thru a press and make papyrus
Really good idea. I’ll have to find a press to try this with!
try a rolling pin? the egyptians did not have a press.