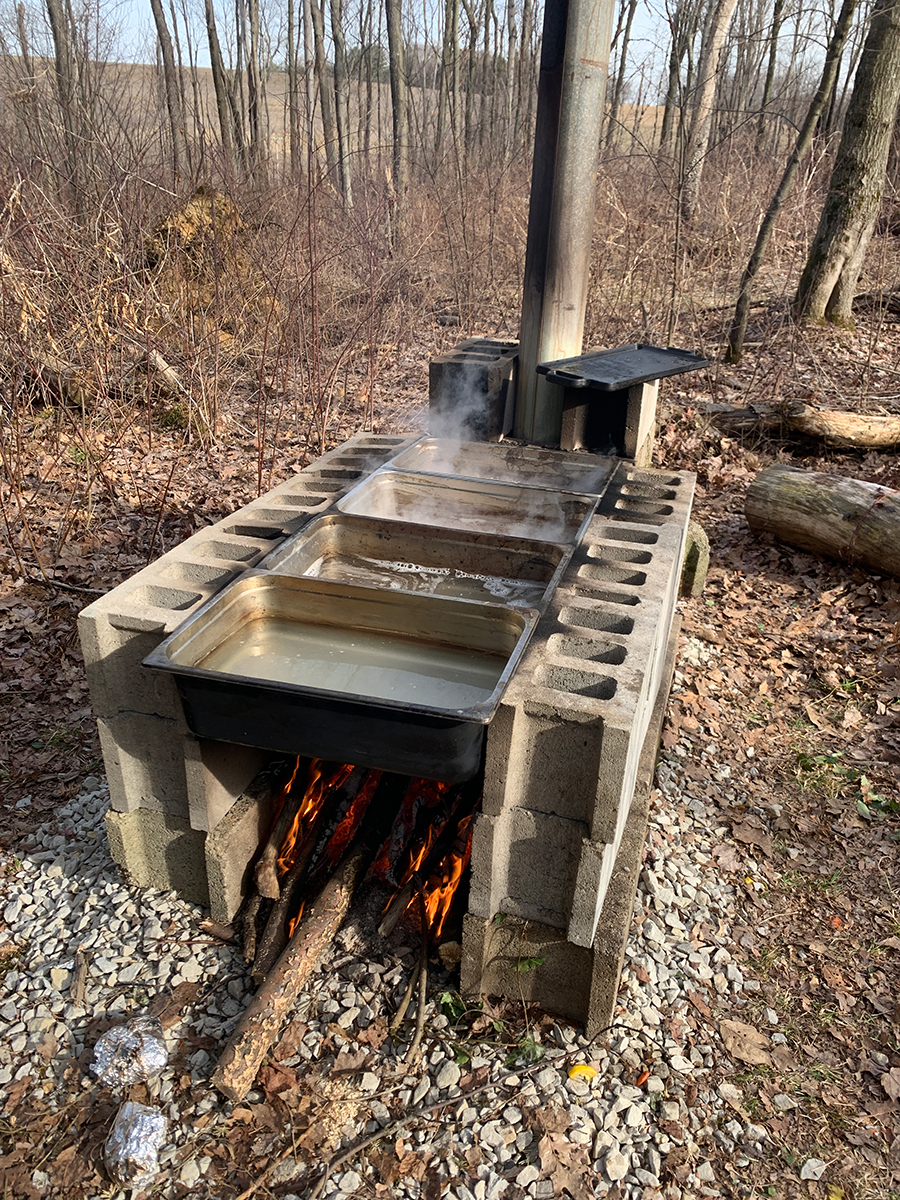
Maple syrup season is one of my favorite times of year. Honoring the maple trees, collecting the sap in buckets, seeing the magic drip from the trees, and feeling the return of early spring. Sap begins running just after the deep freeze is over, usually in early February here in the Alleghney Mountains in Western Pennsylvania. A very important factor in collecting sap is having a plan for boiling that sap into maple sugar. Today’s post will give you full instructions for how to build a very wood efficient outdoor maple sap boil system using bricks, a stovepipe, and four restaurant trays. I’ve used this system for five years at two different locations and it is one of the best setups I’ve seen. For more information on maple sugaring, please see the magic of maple trees and maple sap.
There are a few key features about this setup:
- You can boil quite a large amount of sap using relatively small amounts of wood because it is using rocket stove technology. We boiled 40 gallons of sap down in 6 hours in March 2021 this system. That included about 45 minutes of getting the fire going and about 5 hours of boiling. We used two small piles of wood, most of which we trimmed as dead wood off of some of our Norway Spruce trees. Thus, this is an extremely efficient system and can be fueled with downed wood. The best kind of wood for this system is longer pieces of wood that are the thickness of your wrist or less. The goal is to keep the flames on the boil system. Wooden palates also work really well for this.
- This system (new) will cost you about $200, and half of that is the cost of the stainless steel pans and the rest is the bricks and stovepipe. However, many of these materials are quite easy to source for free or used, so take advantage of that. In fact, the stovepipe and most of the bricks all were salvaged here on the land, so the only thing we paid for was the boil pans. If you boil 40 gallons of sap a year, the system will pay for itself in under 4 years (around here, local maple syrup runs about $65/gallon).
- This system requires no skills other than some sweat equity to build!
- The system doubles as a large party grill, so invite your friends over for the 4th of July for some grilled meats and veggies! You will just need to source a griddle for it for this use (we use one for free that a friend gave us from her old oven).
- Wood-fired maple syrup tastes much more incredible than maple syrup finished in commercial boilers. When you boil the syrup with wood, the syrup takes on a hint of smokiness that is just incredible. It’s hard to describe the exquisite flavor, but it is truly one of the best things you’ll ever taste!
So with all of that, let’s get started with how to build your own rocket stove maple sap boiling system!
Materials and Supplies
The following are the building materials that you will need to construct your rocket stove boiler.
- Gravel: Several wheelbarrows full of gravel, depending on how level your original site is
- Concrete bricks: 24 blocks for the sides and approximately 9 blocks for the back (depending on how you construct your boiler). They cost about $3 or you can usually easily find them for free or used on Craig’s list (in the US). We ended up using a mix of bricks foraged from the property that were left by previous owners with some new bricks–you can adjust for slight size differences.
- Stovepipe: An wood stovepipe with a cap is your second piece of equipment. This is necessary for getting the fire really burning as it allows you to create a rocket stove effect for greatly enhanced efficiency. Find one used –but make sure it is for wood and not gas.
- Restaurant Pans: This boil system uses a set of four nested restaurant pans (full size, 6″ deep, stainless steel). These represent about a $100 investment but can be used for years and years. We’ve been using the same pans for 5 years now and they show no signs of wearing out.
You will also need some supplies on hand to complete the job:
- Garden rake or hole to smooth out gravel
- Shovel to help level and move gravel
- Wheelbarrow gravel and bricks
- Level
Choosing Your Site
Once you have your materials, it is time to choose a site. I would recommend three considerations:
- Location: make sure it is at least reasonably near where you are tapping your trees. Large amounts of maple syrup are not exactly easy to move around, and so, you will want your boil system located near your trees if at all possible.
- Trees: Second, make sure wherever your stovepipe is located isn’t too close to branches or trees–the heat coming out of this is pretty intense. You don’t want to damage trees in your sugarbush.
- Level: Finally, you will need to have a level surface for building your boiler, so starting with somewhere relatively level is a good idea. You can always level the area out with soil and/or gravel.
Steps
The end goal is to have a boiler that is 4 standard concrete bricks long, 3 bricks high, and has a fairly sealed in the back that can keep your stovepipe secure.
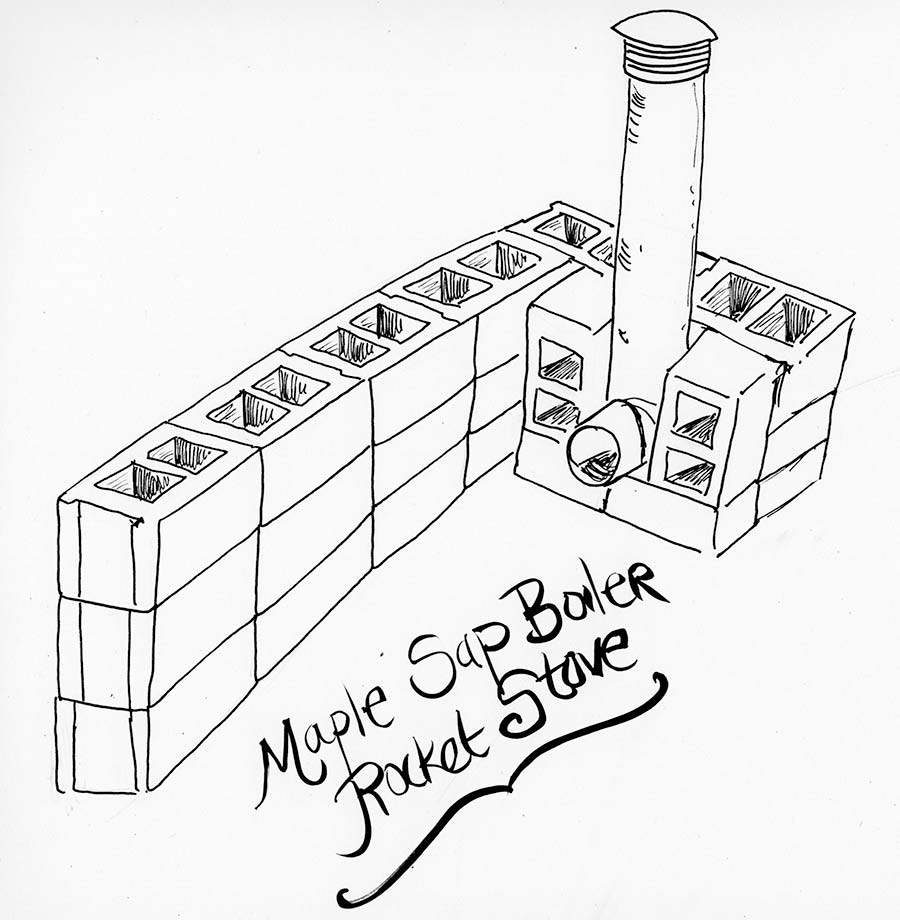 Cut-away view of the Maple Sap boiler with a shot of how to place the stovepipe for getting the rocket action!
Level your site and add a gravel foundation. The first thing you will want to do is create a level site using gravel. We laid down 4″ of gravel across the area where we were building our boiler. Level out the gravel as best you can, and check to see that it is relatively level before you start adding your bricks. You can do this by using a larger level or use a smaller level on a piece of 2×4 board. Adding gravel is important for two reasons–first, it allows the site to have good drainage and it prevents frost heaving (which is obviously an issue anywhere you are harvesting maple sap).
Build your walls, ensuring they are level and that the pans fit between them. Next, you will build your two walls, building one tier of bricks at a time. The first tier of bricks is two lines of four bricks across, and 21″ apart (the pans are 20″ 3/4″ wide). As you work, make sure your bricks are level both short-wise and long-wise so that as you build your structure, you can keep it level. After you lay your first set of bricks along both walls, double-check that all four of your pans fit and adjust accordingly.
Then, add your second layer and repeat the process, and finally, add your third layer and repeat once more. At this point, your pans should fit snugly, but they should be able to be lifted out and put in with relative ease (remember when you start boiling, you will have to remove them at the end of the boil!)
Build your back and secure your stovepipe. I‘m going to show photos of how we built our back. There are a few considerations. First, you want to seal it up as much as possible so that the airflow goes primarily through the pipe and out any cracks (you can use cob for this or even small pieces of the concrete block). You could use ashes or vermiculite if you wanted, but we just added smaller pieces of block. Second, you will want to make sure your stovepipe is extremely stable so once you start boiling, you don’t encounter issues where it falls over, etc. Second, you want to make sure you place a half brick or large stone under the pipe–as the ash builds up as you are burning all day, you do not want the pipe to clog. Ours sits about 4″ off of the ground.
We had an interesting chimney-sized brick that was a square with a hole on our property, so we used that as something to better hold our stovepipe. You can also just hold it in place with a few bricks long-wise. After all of this building, you are ready to fire it up and boil!
Using your Boiler
I have some tips and tricks for using this boiler, as I’ve been boiling sap on this kind of setup for six years. Here they are:
The absolute most important thing is to make sure your fire is going well for about 45 minutes before you add your pans. One of the things that will cause the most grief and slow down your boil is a poor fire with your pans added too early. If you get your fire started and wait at least 45 minutes, keeping it fed, by the time you add your pans, it should be able to keep going. This means you need to procure wood and make sure its dry before the day of your boil (cause no wood outside is dry in Feb/March!)
Make sure you have dry wood that burns well. Your goal is high flames and a hot fire–not coals. The flames should be touching the bottom of your boil pans. This means you want smaller diameter wood (sticks, branches, wood palettes). Often, your sugarbush will have enough downed branches that if you collect and keep dry, you will have enough. If not, pick up some pine palates–they work wonderfully in this boil system and burn very hot. Cutting dead branches off of nearby conifers is also excellent and will yield many flames. We recently had part of an Eastern Hemlock come down and a year later, that wood is amazing for sugarin’.
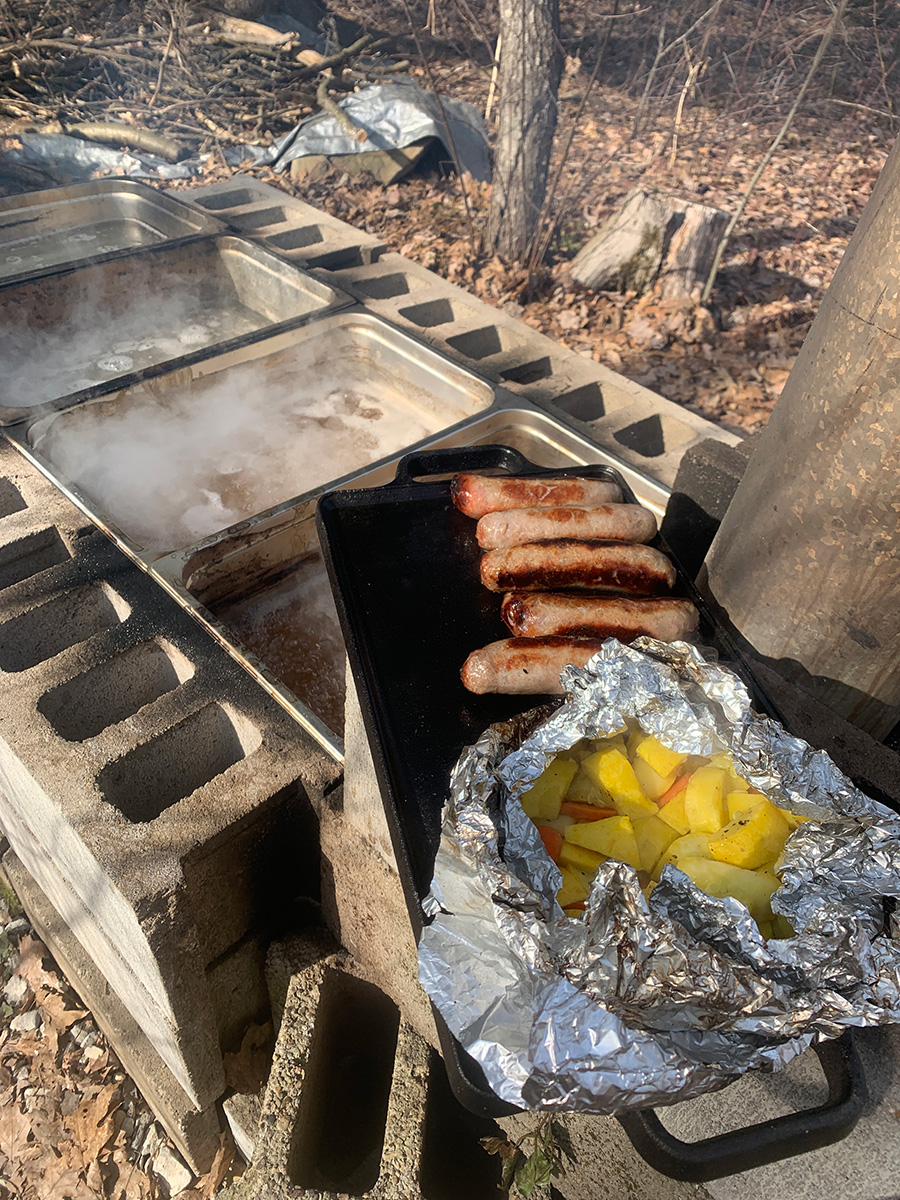
You will need to tend your boiler throughout the day. Plan on feeding it wood every 15 min, keeping an eye on the amount of boil, adding more sap, moving sap, and generally enjoying the day. This is an activity that requires your presence and is certainly “slow food.” Choose a nice day for boiling–you want a sunny day, as warm as it can be. Usually, here our trees run in late January and through February and we choose to boil on a warm day in early March for boiling.
For your boil, you will want to have some kind of wire skimmer/strainer with a fine mesh, a mug or dipper for moving sap between the different pans, some heat-resistant gloves or mitts, and a vessel for transporting your finished sap (I recommend a pressure canner since it has the locking lid) for moving your hot sap to the house for finishing. The oven mitts WILL get sooty so those from your kitchen will likely be ruined (which, of course, I learned the hard way).
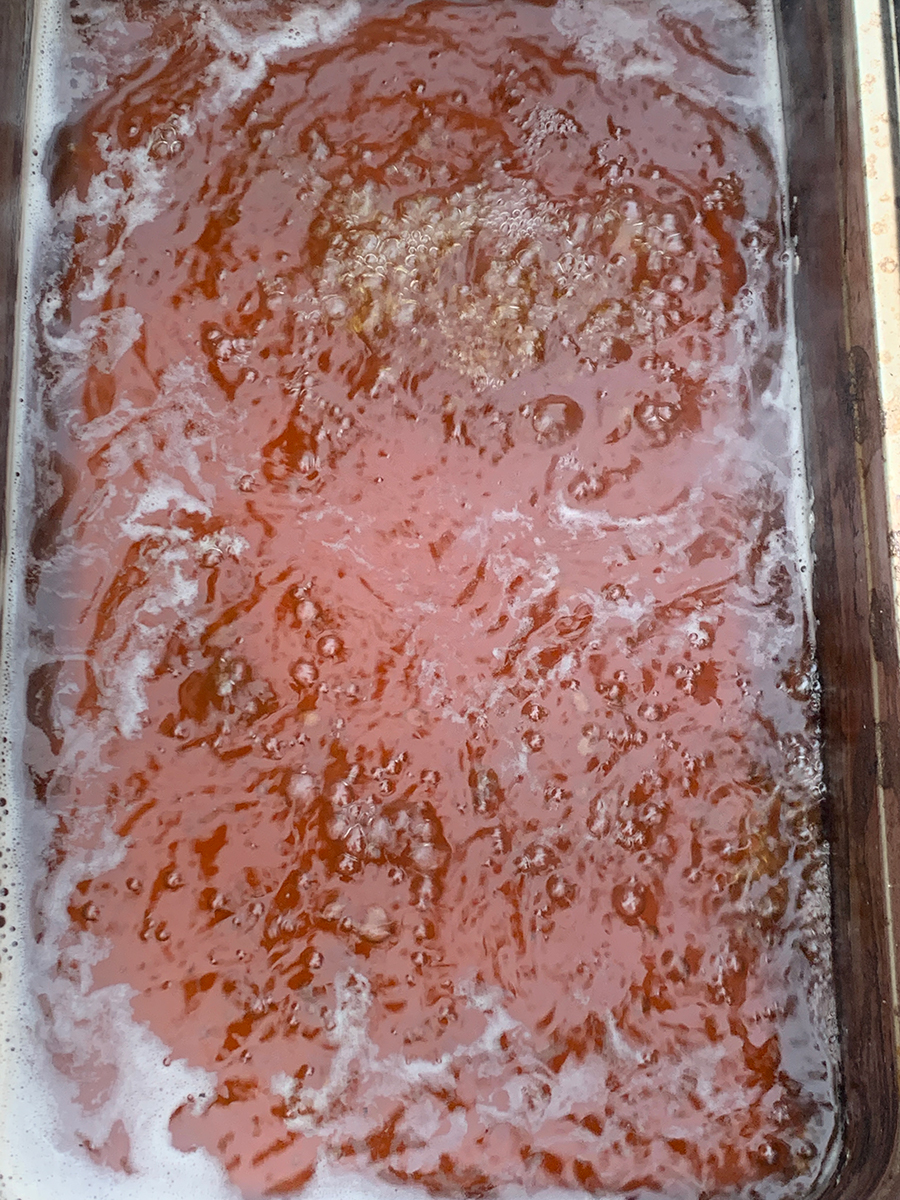
You want your sap to be actually boiling–if it’s steaming but not boiling, it will take a LOT longer to boil off and your fire needs to be hotter. Getting that rolling boil is necessary to make progress on your sap. You can get it too hot and then it starts to boil over–just add more cool sap to cool the pan down if necessary.
The bricks next to the stovepipe will have a little bit of rocket action themselves–so it is a good place to cook yourself some lunch or dinner, especially if you have an iron griddle (see below).
Sugaring can be a really fun and community-oriented event. In the many boils I have participated in over a decade, I’ve learned how to carve spoons, weave baskets, make cordage, and a number of other natural crafts that we would enjoy as we sat around the fire and took turns tending it.
As you are gathering up your sap, make sure to discard any ice in your buckets or storage containers. The sugars stay in the remaining non-frozen sap, so you can save yourself hours of boil time by removing the ice–this condenses down your sap and there is less to boil off.
The point of an outdoor boil is to boil off 80-90% of the water–and then take it indoors for finishing. It’s hard to maintain the right levels of heat in this system to get it 100% of the way–you risk scorching or burning it. So by doing most of it outside and finishing it on your stove (where you have full control) you are able to really be effective.
Sugaring Stage 1
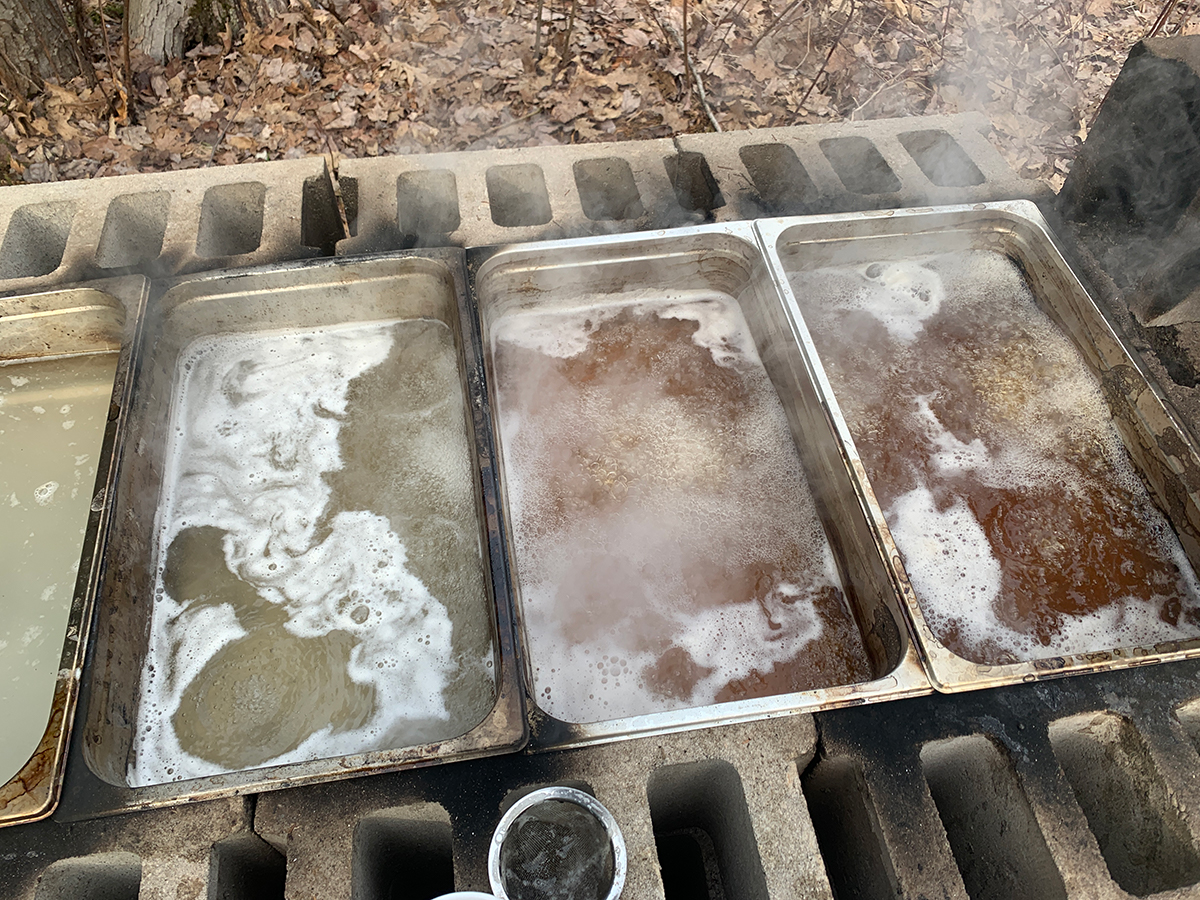
Get your fire going and wait about 45 min until it is going really strong and well. If you add your pans too early, you will struggle to get the fire going and waste a lot of time. Once it is going and will stay going when you feed it wood, add your boil pans being careful not to burn yourself. Then, pour 3″ of sap in each pan.
The way this system works is that the pans closest to the stovepipe will be hotter than the ones further out. So your first pan, at the opening of the fire, will be your warming pan, your second pan will be hot and maybe boiling and pans 3 and 4 are your main boiling pans. You can see this from my image.
Feed your fire regularly, trying to make sure the flames are enough to keep at least your first two pans boiling steadily. As the pans start to boil down, you will add the liquid from the 2nd pan into the 3rd and 4th as they boil. Then add sap from the warming pan (1st pan) to the 2nd pan, and add more cold sap into the warming pan. Use your mug for this.
This method works best because if you are adding cold sap directly, you are slowing down your boil–and the more you slow down your boil, the less efficient you are. By adding sap from the second pan that is near boiling, you will not slow down your boil. By having a warming pan, you keep the sap heating up and ready to move. As you boil, your final two pans will get darker and darker as the sugars are concentrated in the syrup.
As you are boiling, there will be bits of stuff in your sap–strain it as you add it, but the smoke and ash will continue to come into it a little bit (this is GOOD as it gives amazing flavor). As the foam appears, skim it off and discard it.
Toward the end of the boil, you will either boil through your sap or get tired and want to call it a day. At this point, your strategy switches. You don’t want to boil it too far down or you can risk it turning to sugar–and the outdoor boil system isn’t very precise. One of the things to look for when you are getting ready to be done is that the bubbles in the boil get thicker and the color turns much darker. So, as you see your pans boil down and you are out of sap, you can start removing them. First, pour off any remaining sap into your 2nd pan from your first and remove it. Then, do the same with the second. Allow these to boil down another 15-20 min and then, rake out your coals.
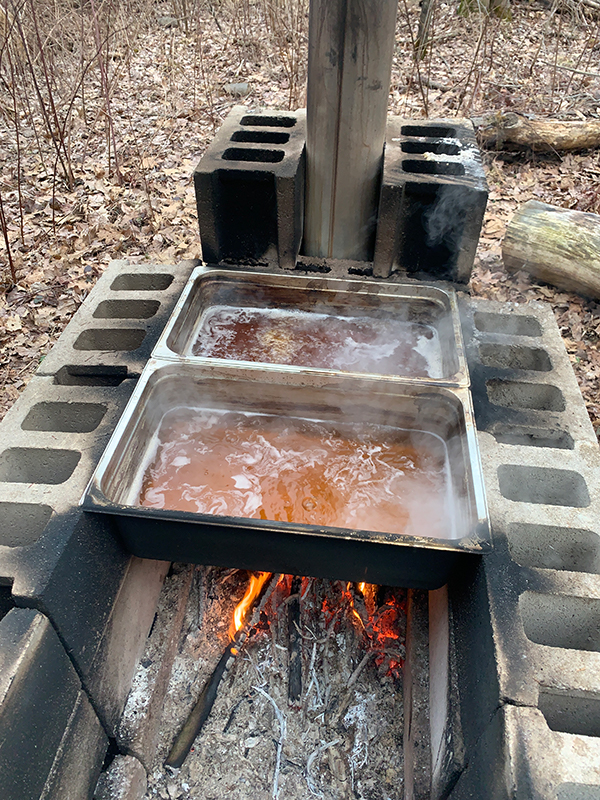
At this point, you will want a good vessel that can carry your sap back to the house. The absolute best tool for this job is a pressure canner with a lid that locks. This will prevent you from burning yourself and you can finish it right in the pressure canner.
The easiest way to remove your sap is to label it out with your mug into your pressure canner until the boiling pan is almost empty. Then, with a friend, each of you can take one side and pour off the rest. The pans are hot so be careful. They are also covered with soot, and you might be too after handling them.
At this point, put the lid on your pressure canner and take it back to the house. You still have to boil it down a bit more on the stove.
Indoor Finishing
Finishing your sap indoors usually takes another hour or two, depending on how far down you were able to get your sap. Bring your sap to a boil again, and with a spoon, check it every 15 minutes. You should try to keep an overhead fan running–if you boil too much sap down in your house your house can actually get sticky (this is why we do outdoor boils). After another hour or two (or 5, if you still have to go quite a ways), you will boil it down to the point where you have a thick and lovely maple syrup. What I usually do is bring out a little syrup I have from the year before and compare it to what is in my pot–and when I get to the same consistency, I am done.
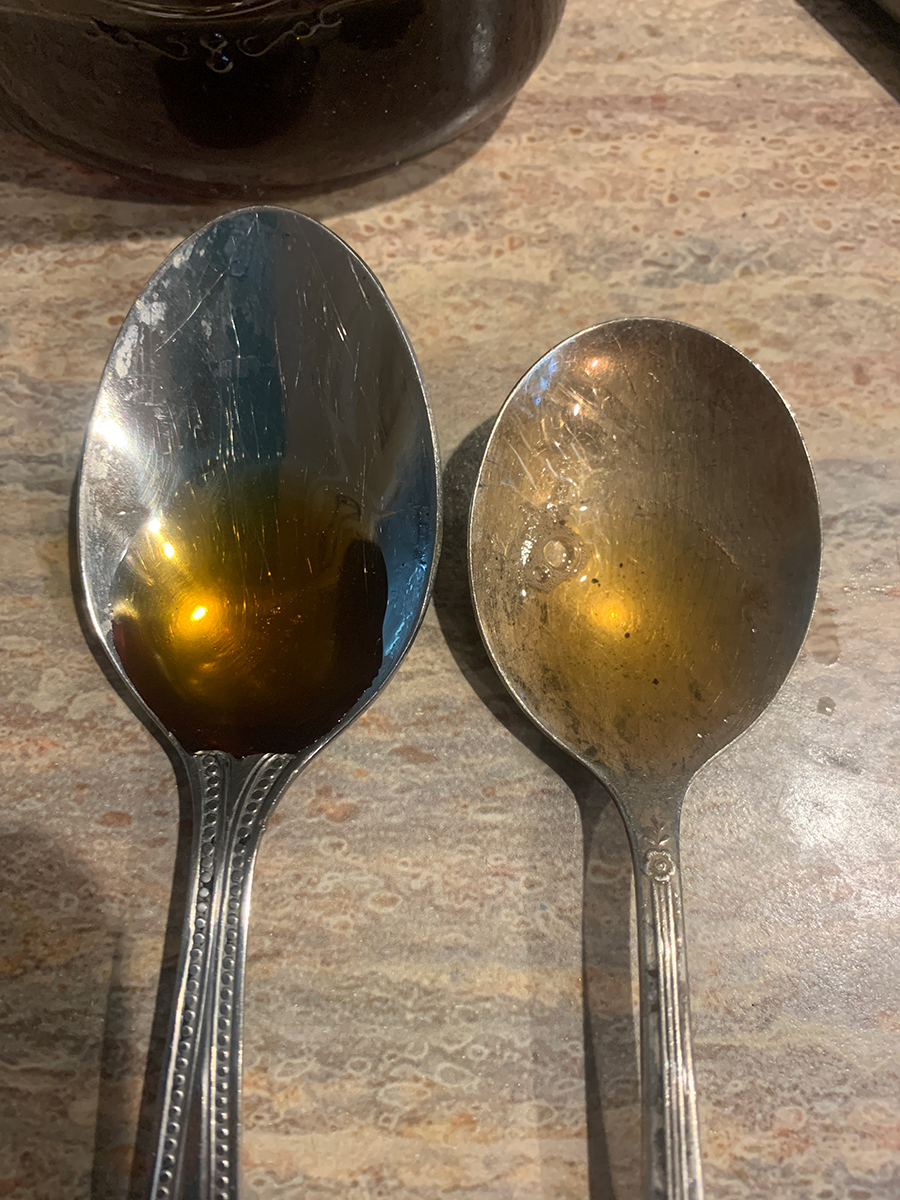
Get yourself a few clean mason jars, and pour your sap into your mason jars. Wait 24 hours. You’ll have some stuff in the bottom of the jars from the ash and smoke from the boil. Pour these off carefully, making sure not to get any of the stuff from the bottom of the jar. Usually, if I’m pouring off 3-4 jars, I will pour all of the sludge into one jar and let that sit a second time, and pour it off a second time. That’s the syrup that I will use first. The idea is to get as much of that out–because that will impact the shelf stability of your syrup. You can also experiment with finely woven linen or cheesecloth to get all the bits out.
There you have it! This is literally one of my favorite activities to do all year–it is meaningful, sacred, and fulfilling. I wish you the brightest blessings of the maple tree and joy in your endeavors.


I started making maple syrup 10 years ago, learning from videos. I consider it one of my super powers! Although my road is Maple Hollow, I believe I’m the only neighbor who makes it.
Glad you are still carrying on the traditions! I would love to see some photos with your boil system :).
I made a slideshow my first year. I’m not having any success emailing it to you. The address is “invalid”.
Now this is awesome
Thank you!
Thank you. It’s always a pleasure to find good reads like this
I will definitely be giving this a try. I have four magnificient Sugar Maples and have been wondering where to start. Thank you!
A strainer of the type restaurants use to filter deep fryer oil will remove the sediment at the end. And for about $10, you can get a hydrometer to test sugar content (Brix) and verify syrup is concentrated enough to be storage stable- Or a good thermometer, it is done at boiling point of 217 – 218°F, assuming you are near sea level.
Thanks Robert! 🙂