 Dana O'Driscoll
 In paths untrodden
In the growth by margins of pond-waters
Escaped from the life that exhibits itself
From all the standards hitherto publish’d—from the
pleasures, profits, eruditions, conformities
Which too long I was offering to feed my soul
–Walt Whitman, In Paths Untrodden, part of Whitman’s Calamus Cluster of Poems
I am always looking for ways to expand my garden and what I can grow, and to develop new techniques for plants that have special growing conditions. As ecosystems grow more and more strained, I’m very cautious of where I harvest or what I purchase, particularly from wildcrafted sources. As I’ve written about before, I’m particularly skeptical of the “wildharvested” label, particularly of at-risk native species, as we have growing strain and demand on all ecosystems. The more that I can grow myself, tend, and cultivate–the better for the land. One plant that I used to wildharvest and have since learned to cultivate is Sweet Flag, including Acorus americanus (aka. Acorus calamus var. americanus) and Acorus calamus. These plants are semi-aquatic and have a unique role in my herbalism practice; they are plants that I depend on for my own medicine and teach about. But these rare wetland plants are challenging to find where I live, are not abundant, and when I do find them, they are often in places that have pollution or are ecologically sensitive (as most wetlands are). In other words, I don’t want to harvest this plant from the wild. When I have attempted to purchase Calamus, I am very unhappy with the quality, and I am also skeptical, as I don’t know the ethics of who is harvesting. The problem is that our land is very shady, and while we do have some very nice wet areas, they are all in the forest. We don’t have any wet, full-sun areas with flowing water, the kind that Calamus really likes. Three years ago, I decided to create a Calamus pool out of a leaky old duck pool and see if it would work. It worked amazingly well, so well, in fact, that I have just built a second one–and this time, I took photos of the process so I can share it. I believe that you could use this process for just about any water-loving plant–cranberry, horsetail (add sand to soil), boneset, and others that would like their roots to stay very wet. Adapt as necessary.
The Medicine of Calamus

Calamus has thousands of years of human use and, to me, is a plant with medicine unlike any other. My favorite use of Calamus is particularly helpful in bringing voice to ideas (e.g. you tuck a piece of calamus in your mouth before you speak, or even write, and the words help flow out). Calamus is also being increasingly used to help focus the neurodiverse mind, and as someone who has dyslexia and dyscalculia, I find Calamus to be one of my best allies. My brain is constantly inverting everything, which causes problems with daily life–Calamus helps me bring things back into order and reduces the amount of inversions, allowing me to better focus. Calamus also has great potential for people with other neurological conditions such as dementia and alzheimers in helping them stay focused and present. Calamus is also an aromatic, bitter plant and is a wonderful support for healthy digestion, which includes addressing slow-moving digestive issues, nausea, or motion sickness. As Calamus looks like a throat and larynx, Calamus is also used as a traditional remedy for sore throats or laryngitis. In larger doses, Calamus produces a very stimulating effect, and according to Steve Andrews in Herbs of the Northern Shaman, the plant was traditionally chewed by Cree Warriors and hunters to keep alert on long hunting expeditions as well as used in rituals. Most herbalists prefer the rhizome–but I like the root as well and find it to be really mild and nice. So, I have it available to chew for any of the above purposes. In fact, I wrote and revised this entire post–and most of my posts–with some Acorus calamus tucked in my mouth. Once harvested, the root loses potency within about 6 months, so having good access is necessary for the best medicine. I have a handout from the Pennsylvania Herb School I use when I teach about this plant, and you are welcome to download it for more details on the medicine of Calamus.
Calamus also has a history of ritual and sacred use. I have been fascinated by Calamus ever since Jim McDonald taught me of this amazing plant over 15 years ago, and as part of this fascination, I’ve spoken to many herbalists and shamans who have used this plant over long periods of time. The general consensus is that in order to have psychotropic experiences, you need to A) develop a deep relationship with the plant (which I’d argue is true of all of the teacher plants and mushrooms) and B) consume larger doses (due to the chemical composition, Acorus americanus is the best option for larger doses). Andrews in Herbs of the Northern Shaman give specific dosages–he says that you to consume about 2 inches of the rhizome for a “stimulating effect” and “6-10 inches” for a psychedelic experience. I will note that this is a massive amount of the plant, so take Andrews as you will. Even in smaller doses, there is no doubt that Calamus has a consciousness-shifting perspective and can lend benefit to meditation and spirit work of all kinds.
Creating Your Wetland Calamus Pool
Hopefully the above has convinced you that building a relationship with Calamus is well worth it! Here are my instructions to create a wetland pool from recycled materials. Even a small pool will allow you to grow a good amount of Calamus, more than enough for your personal use and to share with friends. Once the pool is established, harvesting regularly from the pool and adding new compost will ensure a healthy growing site for your Calamus for years to come.
Step 1: Observe and select a site.
Start by observing your land and deciding where the most appropriate place is to build your Calamus pool. The considerations will be a A) full-sun spot with B) ample and daily access to water. You might, for example, site the pool on a slight hill so when it rains, water goes into the pool. Consider also what happens if you end up in drought, as weather patterns are no longer stable. You will want to think about how you are getting regular water into the pool so it can remain wet. Maybe this means diverting a downspout from your metal roof or greenhouse into your new pool (do not do this if you have an asphalt roof; those roofs are toxic and as a root/rhizome medicine, calamus could concentrate those toxins in the root and rhizome). Maybe this involves putting your pool next to something you have to provide water to each day, like your geese or greenhouse.
As a permauclture designer, I always think about existing energy flows and how to work with existing energy flows. In our case, I put in both Calamus pools right next to our greenhouse, and during the growing season, since I already water the greenhouse daily. The pools are also in the path of both the spigot where I turn on/off the water, and in the path of the ducks and geese, who need fresh water every day. Thus, I am not really expending any additional labor by placing these pools where I did. I also need a place to set the hose down while I turn it on and off, so I am now turning those moments of water waste into a resource–all of the extra water goes into the Calamus pools to keep them wet and happy.
In the future, I also hope to create a downspout system off of the back of the greenhouse so that when it rains, the pools get filled. However, these pools are pretty small, and I don’t want the top soil to get washed away in a heavy rainstorm, so I haven’t really figured that part out yet. I might, for example, add a water barrel system. The greenhouse will need to be re-covered in the next year or two, and my plan is to set up this system when I re-do the greenhouse covering.
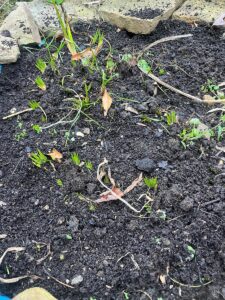
Step 2: Assemble materials
You will need some basic supplies for your pool. It is possible to build this with no new purchases using only recycled materials or those you can find second-hand. Here’s what you need:
- Old pool, water bin, or water-holding feature: Waste is a resource. You might look around, or even get on a local free cycle or community sharing list, and look for a slightly broken or used pool. A lot of people also throw plastic kiddie pools away on the side of the road at the end of the season–which means if you are in the Northern Hemisphere, ask around and keep your eyes open for one. It doesn’t even matter if it has a small crack or hole, as you need drainage anyways. In both of my cases, I used pools for my birds that started to show damage from repeated use after many years–these are animal troughs that had many years of use but were at the end of their lifecycle as swimming pools for the ducks and geese. Once one starts cracking, it doesn’t have a lot of time left, especially moving into winter–but putting it in the ground gives the plastic pool new life. suspect this method may also work if you wanted to try something like a pond liner, but I have not tried it (feel free to experiment and report back).
- Sand, stone, or pea gravel: You will want something at the bottom that helps it drain and move water through–about 2″ of gravel. You can even just pick up small stones and put them in the bottom. In my first pool, I had some spare pea gravel I had used for another project, so I put that in the bottom, and it worked great. In my second pool, there was a lot of pea gravel and small stones where I was digging, so I just saved them and put them in the bottom.
- Drill or utility knife. You will be adding several small punctures or holes, and you’ll want something to make your holes safely and effectively. Thinner plastic can be easily punctured with a utility knife, but thicker plastic benefits from a drill.
- Compost or topsoil. Rich and fertile for your plants. I have been using our finished compost (which we make primarily from our animal bedding and various composting methods). This is specific to Calamus–if I were going to put in a horsetail bed (which I might do next), I would add 50% sand or more. So you want to look at the specific growing conditions of what you are planting. Calamus prefers rich soil, so I used 100% homestead-created compost.
- Shovel. You are going to dig a big hole to place your pool in. I actually had not only a shovel but a small ice pick axe to get through the mountains of stone that was in the bed area. Hopefully your dig will be easier than mine!
- Plants: Obviously, you will want some Acorus plants. You might ask around locally and see if anyone has any, or find a local herb school and ask them (as herbalists LOVE Calamus). If you are in the USA, you should plant Acorus americanus, which is our native Calamus species. If you are in Europe or Asia, you will likely want Acorus Calamus. Both can be used interchangeably as medicine, but Acorus americanus does not contain beta-asarone, which is potentially carcinogenic in higher doses. My handout linked above describes this in more detail. Also, if you are in the US in the native range of Acorus Americanus, you can then grow lots of Acorus Americanus and then give her away to friends to plant, and spread her into new ecosystems, of course, benefits the ecosystem. I sourced my Acorus Americanus plants on Etsy from a North American seller, and they have been doing wonderfully since being put in the new pool about a month ago.
Step 3: Dig your hole.
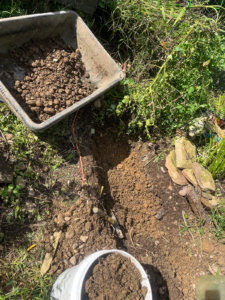
If you live in a northern climate, it is really important that your plant roots stay submerged completely below the surface of the soil–your goal is to get your pool level with the ground, as my photos show. This means you will want your hole dug as deep as your pool so that the roots will be under the soil line for freezing. If the roots are above the soil level, they will freeze, and you will lose your Calamus. As you are digging, keep checking to see if your pool fits. I will note that this design allowed my first Calamus pool to survive the brutal winter of 2025-2026, when we had literally months of sub-zero temperatures.
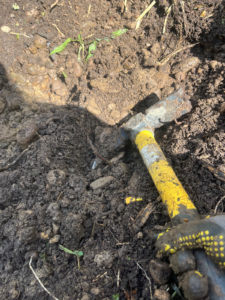
My personal challenge is that near our greenhouse was the site of an old swimming pool, and every time we dig into it to establish new beds, we find more awful black plastic and huge amounts of stone. It is a battle. It took me three days to dig this little hole–but it was worth it.
Step 4: Prepare drainage in your pool.
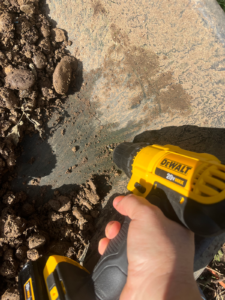
You will want several small drain holes–not many at all–but enough to ensure the pool water has a chance to drain very slowly and not be completely stagnant. I put three small slices in the round duck pool with a utility knife (my first design) and four tiny holes (with the drill bit) in my second pool as this pool was much thicker. Calamus can actually grow well in stagnant water for a period of time (longer than you would think), but at some point the whole thing gets foul and I’m not excited about harvesting roots from a foul situation for medicine. If your pool can slowly drain, that won’t be an issue. Don’t add too many holes–a few small ones with the gravel on top are all that you need. You might test this with some water before you place the pool into the soil to ensure you have slow drainage. You can always drill more holes, but you can’t un-drill them, so keep that in mind.
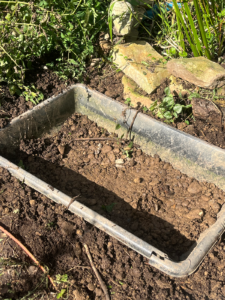
Step 5: Place your pool in the hole and add your gravel layer.
I have found that 2-3″ of gravel in the bottom is ideal for this design. Not only does it help with drainage but, just as importantly, it really helps with harvest and allows you to get out wonderful-looking roots that come out whole and intact. When I pull out calamus from my pool, I have not only the very aromatic rhizome, but also all of the roots (which are more mild but are really, really nice if you want to chew on them–this is my preferred use of the roots. Not all herbalists use them as they are very hard to harvest, but this method allows for more access to the roots coming off the rhizome).
Step 6: Add your compost layer.
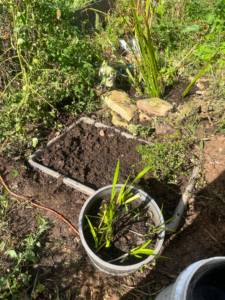
Now, add your compost, filling it almost to the brim (as it will settle as you wet the bed). You will want some clean and rich compost. Calamus likes rich soil.
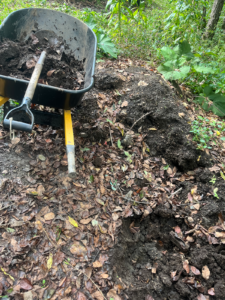
Here I’ve filled the pool with the beautiful compost and my Acorus americanus is ready to plant!
Step 7: Wet your bed fully before planting.
Before planting, water the whole bed thoroughly. You may need to top up your compost at this point.
Step 8: Plant your Acorus (or other water-loving plant).
Plant your Calamus roots and rhizomes. The rhizomes live just below the surface, but the roots go deep, so keep this in mind as you are planting. Give them your love. Welcome them to their new home. Play them some music and sing to them.
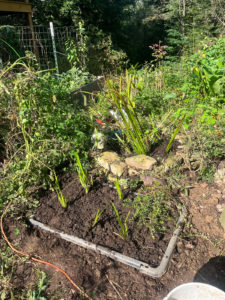
Step 9: Let your pool grow for a while.
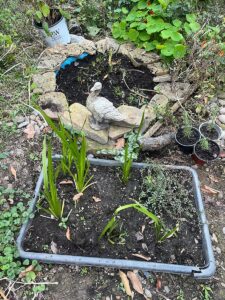
Let the calamus grow and expand in the pool. I did this for a year without any harvesting my first pool. Then, each year after that, I harvest about 40% of the pool and add fresh compost–I usually harvest in two batches, once in summer and once in later fall. You should also keep your pool weeded of aggressive plants, but you might let some that will co-habit grow. For example, I have decided to let some ground ivy and chickweed grow on top as a living mulch to keep the water from evaporating quickly. Now, I’m in a place where I want the calamus to continue to grow and have space, so I am managing the space in the pool with harvesting. Which is great, as my herbalism students and I always have a need for more calamus.
This year, I even had enough calamus to share with an herbalist friend, and we were able to do a hydrosol steam/water distillation with both leaf and root–she provided some, and I provided some, and we had enough. That was a real blessing and something I would like to do again in the future. She was able to use the hydrosol and essential oil to help her husband with Alzheimer’s.
Honoring Calamus
I will conclude this post by sharing a second poem from Walt Whitman, an American poet who wrote the famous Leaves of Grass book of poetry in the late 1800’s. In fact, Leaves of Grass refers to Calamus! Whitman was so inspired by Calamus that he wrote a whole cluster of Calamus poems in his book, all of which you can enjoy on the Whitman archive. I love to think about Walt Whitman lying in the scented Calamus leaves, being at peace and writing his poetry. I will conclude with a particularly vivid Calamus poem, compliments of Whitman! I hope this poem and this post inspire you to grow calamus and work with this amazing plant teacher.
SCENTED HERBAGE OF MY BREAST.
Leaves from you I yield, I write, to be perused best
afterwards,
Tomb-leaves, body-leaves, growing up above me, above
death,
Perennial roots, tall leaves—O the winter shall not
freeze you, delicate leaves, E
very year shall you bloom again—Out from where you
retired, you shall emerge again;
O I do not know whether many, passing by, will dis-
cover you, or inhale your faint odor—but I be-
lieve a few will;
O slender leaves! O blossoms of my blood! I permit
you to tell, in your own way, of the heart that
is under you;
O burning and throbbing—surely all will one day be
accomplish’d;
O I do not know what you mean, there underneath
yourselves—you are not happiness,
You are often more bitter than I can bear—you burn
and sting me,
Yet you are very beautiful to me, you faint-tinged
roots—you make me think of Death,
Death is beautiful from you—(what indeed is finally
beautiful, except Death and Love?)
—O I think it is not for life I am chanting here my
chant of lovers—I think it must be for Death,
For how calm, how solemn it grows, to ascend to the
atmosphere of lovers, Death or life, I am then indifferent—my Soul declines
to prefer,
I am not sure but the high Soul of lovers welcomes
death most;
Indeed, O Death, I think now these leaves mean pre-
cisely the same as you mean; Grow up taller, sweet leaves, that I may see! grow up
out of my breast!
100% Human Statement: Walt Whitman didn’t use GenAI and neither do I. Everything produced here–images, artwork, and words is 100% human-created. I have been writing and making art for my entire life, and I refuse to allow the machine to eat my creativity. Keeping it human! No Gen AI was used for any part of this. I do NOT consent to allow these words and images to be used by GenAI systems. I do NOT consent for this material to be used as training data.