
I have always longed for a greenhouse. As a homesteader in MI, I only had small hoop houses that I moved over crops, and while they worked great, they did not afford the flexibility that a larger greenhouse has. When I bought my new property in the fall, I knew that I was finally going to be able to put up a real greenhouse! And so, this post describes the construction process of the greenhouse from a 9×18 foot used carport. These instructions will include a step-by-step process for creating a hobby greenhouse using very layperson’s terms since that is all I have. Two people built this project in a weekend. This post will focus on the structure–I will have one post on bed preparation and insulation of the beds of the greenhouse to prevent frost issues, and a 3rd post eventually on the cob heatsink wall that I am planning for the north face of the greenhouse.

Used carports actually make wonderful greenhouses. They are often much tougher than the commercial greenhouses they want several thousand dollars for–the carport is very solid and sound from a structural perspective and offers a strong frame. We have had some 60 MPH winds come through here recently and several foot plus snowfalls over the winter, and my little car port greenhouse is in excellent shape. My carport was gifted to me by my dear friend Linda from Nature’s Harvest Urban Permaculture Farm. This was a greenhouse she used for several years for seedling starting and when she was done with it, she passed it on to me. I’ve carefully carried it with me through several moves and now it is in its permanent home!
I’m going to walk through the build for this greenhouse step by step. I had help from a friend who had some tools and framing knowledge–but we basically built the entire thing with four tools: a miter saw, an impact driver, a square, and a tape measure. T
Greenhouse Site
Locating the right site for your greenhouse is quite important. You want it to have full exposure to the sun year-round, depending on your climate and needs. For my greenhouse, exposure especially in the dark half of the year is important if I want to keep harvesting vegetables in the fall and have a safe shelter for seed starts in the spring. Here is some good information on greenhouse placement that goes into more depth.
I was very lucky that the property I bought had an old flat pool area, very close to the house, that had full sun exposure. I set it on an East-to-West orientation for full sun. The spot also had easy access to power (an outdoor box), water (both drainage from the roof and a nearby hose hookup) and was in “zone 1” in permaculture terms from my main house. Greenhouses need frequent tending in the fall and spring, so keeping them close to the house is important. With these things considered, we can go ahead and start to build!
Greenhouse Build
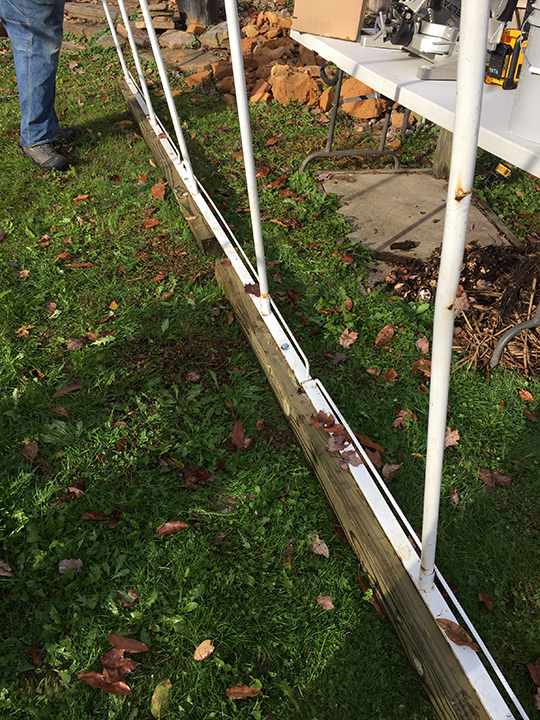
Step 1: Create a good foundation. Since my foundation was solid clay and almost completely level, we began building the greenhouse by attaching the structure to lengths of pressure-treated 4×4″ beams. I was concerned that since there is wind here, the greenhouse would blow away. We also wanted to keep the metal itself up off the ground to prevent any rusting. We used washers and standard screws to screw the metal frame into the boards.
Step 2: We used self-sealing metal screws to assemble the carport together. This helped hold the metal together and solidified the frame (since it was used, the original components for it were long gone!).

Step 3: Sealing any rusted areas. We also took some Rustoleum and sprayed any areas that were a bit rusty to encourage the greenhouse to last. They get very humid, so any rusty places will not last long. This is where I got introduced to my favorite tool ever, the Dewalt Impact driver. It was very helpful for this project because I could put in many difficult screws (like metal to metal) with limited arm strength.
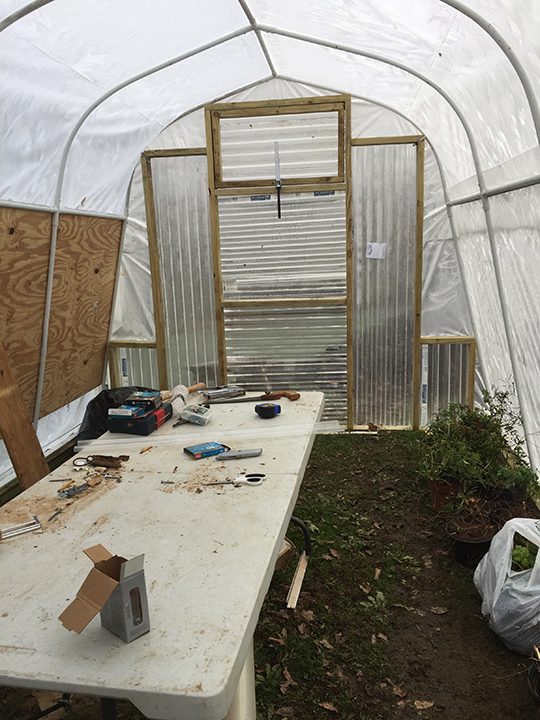
Step 4: Framing. For the novice builder, this is probably the most challenging part, but I had a friend who knew what he was doing. We began framing out the sides and planning a large door so that I could bring a wheelbarrow in and out easily. Large doors on both sides and windows also help with venting. Here’s when we started framing it. All of the wood is pressure treated.


Step 5: Greenhouse Spring Locks. After shopping around, I settled on these greenhouse spring locks that allow you to attach the plastic to the greenhouse. My carport had a nice ridgeline across the sides about 4′ up, this allowed us to attach the strips there (using the self-sealing screws again).

Step 6: Back wall. The north-facing wall of a greenhouse is useless–it doesn’t transmit much light and it simply loses heat day in and day out. Many more traditional greenhouses, like those in use in China, use a back wall that is not exposed or that is sunk into the earth to preserve heat. My plan for this greenhouse is to turn the back wall into a cob wall that will gather up the sun’s heat during the day and release it at night. Cob is a natural building material that is a mixture of clay, sand, and straw (I have ample clay on this property, which is what gave me the idea).
In order to begin to prepare for the wall, we two boards up so that I had a good surface onto which to build my cob wall. We attached the boards right through the frame using more longer metal screws.

Step 7: Greenhouse plastic. There are a lot of options for greenhouse plastic–I went with a standard 6mil clear greenhouse plastic. It is really important to use the right plastic that is greenhouse grade–if you just use a plastic dropcloth, the greenhouse will fall apart within a year or two due to the solar rays breaking down the plastic. I learned this the hard way at my old homestead!
The second part of the spring lock system is a little black zigzag strip that is plastic coated. I’d highly recommend them. They are super easy to use and if you mess up, you can just take the little strips out. This part is absolutely a 2-person job; it is necessary to keep the plastic tight as you are adding it.


Step 8: Doors and windows. I had chosen to add this some clear polycarbonate to the doors and windows–in truth, I regret that choice for a few reasons. First, it is way more expensive than the greenhouse plastic. Yes, it lasts longer, but it is much harder to work with. Second, it is not sealed up nice like the greenhouse plastic–it is variegated, meaning each little dip is a little air hole in your greenhouse. I am still figuring out how to seal them all up! In hindsight, I would have went with only plastic for my greenhouse. But I attached them with special screws that have a little washer.
Step 9: Ventilation. I purchased these automatic greenhouse openers for the vents. This is critical for some automated ventilation, especially if I am out of town or at work and the greenhouse heats up. You simply install them and they are designed to vent the greenhouse. Unfortunately, mine don’t seem to work, so I’ll have to look into another option.
That’s it for the greenhouse build! In an upcoming post, I’ll share how do floor insulation and create beds and share my progress on the back cob wall. I hope these instructions are helpful to anyone who might be looking for good greenhouse ideas!


Reblogged this on Blue Dragon Journal and commented:
For that DIYer who has always wanted a greenhouse!
Thanks for the reblog!
Reblogged this on dreamweaver333.
Reblogged this on A Wayfarer's Story.
Reblogged this on Rattiesforeverworldpresscom.
I am new to your blog and I am really enjoying it! I live in Kingman, Az and I am getting the chance to have a real garden. We have a very small grove of ash trees in the back yard. We now have two garden plots planted with veggies. Thanks for the inspiration!
Hi Margaret,
I’m delighted to hear that you find the blog inspirational! I hope your garden does well this year 🙂
Blessings,
Dana