
 Dana O'Driscoll
Here on Turtle Island, from the dawn of time until about a hundred years ago, Chestnuts were a staple food crop for all life, including human life. A nutritious and carbohydrate-rich nut, Chestnut trees produce a bumper crop of nuts every 1-3 years (mast years), are very easy to harvest, can be eaten fresh off the tree, and are easy to process into a wide range of versatile dishes. You can eat them fresh, roast or boil them, add them to soups or stews, dry them and grind them up to make flour which can be turned into bread, crepes, cookies, and more. In fact, as far as foods go, I would argue they are one of the very best for long-term sustainability, ecological support, and filling hungry bellies. As a perennial treecrop, Chestnuts can be a staple part of a regenerative and ecologically-focused food forest (for an example of them being used as part of a larger regenerative agriculture system, you can read Mark Sheppard’s Restoration Agriculture). They have such great promise for transitioning away from fossil-fuel-based agriculture and embracing regenerative approaches to life.
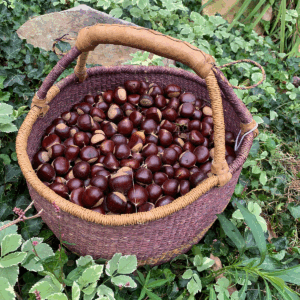
But more than that, Chestnuts are a big part of ancestral foodways and ancestral cultures for many people globally. Here in North America, Chestnuts were a food that brought people and communities together. Chestnuts in North America were beloved as a staple food crop by many different inhabitants, including indigenous peoples, southern slaves, Appalachian people as a whole, where people not only gathered them to eat, but in some cases, even used them as currency. As we are all considering how to build a better world and transition away from things like fossil fuel and capitalist economies, embracing the chestnut and bringing this wonderful tree back into your own local community is an excellent act that allows you to accomplish many goals: honoring the ancestors of the land; reconnecting with local foodways; encouraging regenerative, perennial agriculture; building resilience; and coming together to create food and break bread as a community. This allows us to cultivate reconnection, resilience, and regeneration, three of the 7Rs that help us build a better world.
Here at the Druid’s Garden Homestead, we have two Chestnut trees (planted long before us) on the adjacent property to our house that we have permission to harvest from, and we have about 8 small Chestnuts we’ve planted ourselves that are nowhere near ready to produce nuts. For many years, we’ve been enjoying the yearly Chestnut harvest in various ways, and I’ve experimented so much over the years in trying to figure out the best/easiest way to process them, prepare them, and enjoy them that after almost 15 years of experimentation, I’m finally ready to write my Ultimate Guide to Chestnuts! I also have another post on Chestnut focusing on the magic, mythology, and history, which you might want to read as well. My goal in producing this guide is to provide you with a time-efficient way of making the most out of a Chestnut harvest to produce breads, roasted nuts, and more!
Finding Local Chestnuts

Chestnuts are abundant in many parts of the world. Here in North America, Chestnuts used to be one of the most abundant food sources; however, the 20th-century Chestnut blight, combined with opportunistic logging, has made American Chestnuts much rarer. Many people plant chestnuts, and here in North America usually, you will see European or Chinese Chestnuts rather than American ones, although there has been a concerted effort by the American Chestnut Foundation to replant. And in the photo I’m sharing here, you can still find American Chestnuts in the wild–here’s one I met in Cook’s Forest in Western Pennsylvania. All varieties of chestnut are pretty common to find as many people planted chestnuts as a food source in earlier days, so you may have a lot of them around in your community. Even one tree can produce enough for several human families and wildlife to enjoy, especially in a mast year.
The easiest way to spot chestnuts is actually when they are flowering. Where I live (USDA zone 6, western PA) in early June to early July, you can look for trees that have lots of long strings of tan or lemon yellow flowers coming out of the leaves in cascades–the tree will be covered with them. Once you know what to look for, you know where the chestnut trees are. I have found that many people today don’t value their chestnuts and even find them a nuisance, so if you knock on neighbors’ doors and ask if you can harvest, especially if you are willing to bring a jam or some chestnut flour in exchange, they will say yes. This is to say, ask around and see if you can find a tree or two you can visit each year if you don’t have any of your own. You can also check local parks–they are often full of hardwood nut trees.
Foraging for Chestnuts
It is important to understand how all hardwood nut trees work in terms of abundance. Every 1-3 years, all of the hardwood nut trees will produce a mast year. A Mast year is a year where there is very large number of nuts (and the other year or two have smaller amounts). Where I live, this is a shared communication between all of the hickories, oaks, chestnuts, walnuts, and butternuts where everyone drops tons of nuts at the same time. There will be SO many nuts. And then the next year or two, there will only be a small amount, so you should harvest extra during mast years (as these nuts and flours can store for several years). This is an evolutionary adaptation to keep rodent populations under control–a large amount of nuts means that squirrels and chipmunks bury them for later and then forget, so many small trees can come forth. The population of rodents spikes, and then, there are few nuts to sustain that population in a non-mast year.
And so, once you know where the Chestnuts are, you can come back to your Chestnut each year. When I go to harvest, I like to reciprocate not only by offering my gratitude when I am harvesting, but also in doing a tree wassail for the chestnuts and also leaving offerings. Once I make some cakes or flour with chestnut, I will bring a bit back and offer it to the tree. I also like to play my flute and honor the chestnut. This builds a good relationship that continues from season to season, and your friend is always happy to see you come by.
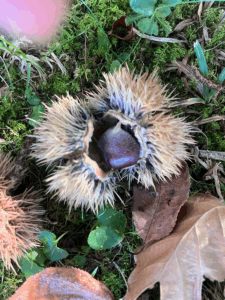
The tree will drop a powerfully spiky ball called a “bur” (similar to the burdock burs that get stuck in your clothing but way larger). The bur will dry and pop open to reveal 2-3 nuts. Sometimes the burs stay on the tree and drop the nuts, but often the tree may drop the burs and they are half open or fully shut. Thus, you might have to still get the chestnut out of the bur. This is easiest to do either with big thick leather gloves or your feet (I prefer just stepping on them and removing them with my feet). Regardless, you do not want to harvest these without good shoes. I recommend a work boot or hiking boot–something with tough leather to protect your toes. I usually wear my rubber all-weather farm boots, and that works great.
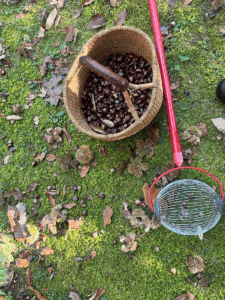
If you will be harvesting every year, I recommend picking up something called a “Nut Weasel”, medium size. Its basically a ball made out of wire on a stick, and you can just roll it over the chestnuts (or other nuts like acorns, hickories) on the ground. It is very fast and saves you from back strain, especially if you are in a mast year. It does require that you spend more time garbling (sorting nuts). But you can harvest many nuts very quickly using the Nut Weasel!
When I go to the trees, I take my Nut Weasel and my big basket, and in a half hour, I can harvest 12-15 lbs of chestnuts, which is really pretty incredible (in survival terms, that’s 8000-9000 calories harvested!)
Good Nut, Bad Nut: The Art of the Garble
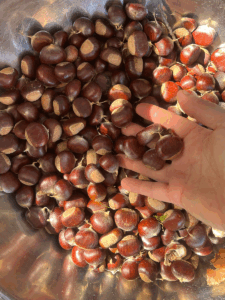
The next step is garbling. Garbling the forager and herbalist’s term for sorting through any harvested material, in our case, chestnuts, and making sure that A) you have only chestnuts and not other debris or other kinds of nuts B) the chestnuts are of high quality and not full of worms or holes. Garbling is critical for all forms of harvesting, but it is especially critical if you are using a nut weasel, as the nut weasel is not a very discerning tool!
Many chestnuts that are organic and wild contain small worms on the edges of the nut. It is almost unavoidable. Like my trees have about 50% of nuts with small worms, but the damage is not significant. If you process them quickly, when you bake them, you will see a darker area or some damage. You can easily cut around a small worm area, which takes up less than 5-10% of the nut. But some chestnuts also contain large weevils, which have already eaten the whole nut. The weevil will come out of your nut and leave a hole when they do so–look for the hole. They usually come out in the 1-2 weeks after the nut drops. As you are garbling, also look for any other damage; the nut is cracked or the shell is broken; the nut is discolored, the top of the nut is discolored, etc.
Sort out the good nuts. Put the bad nuts in the compost or return them to the land. (I think it is extraordinarily disrespectful to throw anything from nature away, return what you got from nature back to nature!).
One method you can use for fast garbling is to put them in a bucket of water. The good nuts will sink, and the nuts with the weevil who has eaten out the center will float. This method also works for other wild nuts, like hickory and acorn.
It is best to process your nuts quickly or the worms that are in a lot of them will eat through them, and you’ll be left with very few viable nuts.
Processing Chestnuts: Five Options
Chestnuts are an incredibly versatile food crop, so part of the fun is figuring out what to do with your chestnuts. You have a number of options:
1) Eat your chestnuts fresh. You can eat your chestnuts fresh from the tree, and they are really great that way. My geese and chickens also love it when I take the hammer and break up some chestnuts for them. I really enjoy them fresh.
2) Freeze your chestnuts. You can freeze whole chestnuts to eat later. This changes the texture, but only a little bit. I don’t typically use this method unless I’m super busy in harvest season and want to get back to processing the nuts a little later in the season once the primary growing season is over.
3) Boil your chestnuts. You can cut the nuts open (cut in half) and then add them to soups, stews, etc.
4) Roast your chestnuts and enjoy in meals. Baking your chestnuts in an oven, dutch oven over a fire, or even in an earth oven is a great way to work with your nuts. They are absolutely delicious after roasting and have an almost sweet-potato quality and flavor! You can add your roasted chestnuts to almost anything – my favorite is to add them to squash, pumpkin soup, or the top of salads or stirfries. Or just eat them on their own as a delicious treat! They will stay good in the fridge for about 4-5 days after you roast them. Freeze those you do not use so you can pull them out and enjoy later. Or dry the rest to grind into flour.
5) Roast your chestnuts and turn them into flour. Roast your nuts and turn them into flour, which is shelf-stable and can be used for a range of dishes. See my detailed instructions below.
Since roasting is the most work and requires the most knowledge, I’m going to walk through this process step by step next.
Roasting Nuts for Flour or Eating: Step by Step
Scoring, cutting, or breaking the shell
Before you roast or bake them, chestnuts need to cut, sliced, or lightly smashed before roasting to let air into the nutmeat; otherwise, they can explode.
One of the hardest things from my perspective is the work of getting the actual nutmeat out of the inner shell (the brown soft shell, which is technically called an “integument.”) The problem is that they are a little slippery on the outside and some are small. I have experimented with many different methods over the years: using my Davebuilt Nutcracker (which I use for Acorns but doesn’t work great for chestnuts); cutting them by hand; cutting them by hand with the aid of a jig that holds them in place, and finally, just giving them a light tap with the rubber mallet. Conventional wisdom suggests you should slice them twice with an X on the top for eating. You can also cut them fully in half. That was how I did it for many years…until I was sick of cutting myself (I am very accident-prone) and decided that the mallet was the best. So I’ll give you what I consider the best two options
Here are two options:
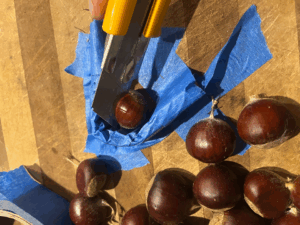
1) You can fashion a jig (I made mine by taking a small piece of cardboard and taping it to my cutting board with masking tape. Then you can wedge each nut into the jig and cut it without hurting your fingers. This is safer than trying to cut the nuts without some support. I use this method if I’m roasting nuts for eating and want whole nut meats. Notice I’m also using a fresh blade to cut–better than a kitchen knife.
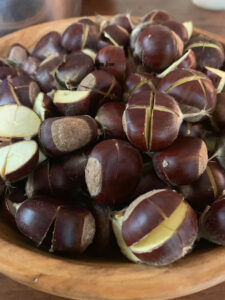
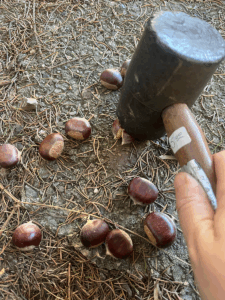
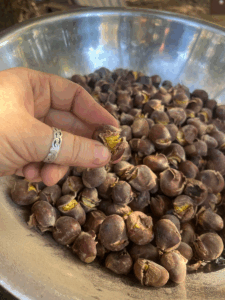
2) If I am doing bulk nuts for flour, there is no need to spend all that time cutting. I have found instead that a light tap with a rubber mallet breaks the shell enough to get the nut out and does not result in you slicing your fingers. The bulk nuts can go right in your oven.
Roasting Chestnuts
Conventional Oven: You can do this a few ways. The goal is to roast your nuts for 25 min at about 350°F (177 °C). You may adjust downward or upwards by about 5 min if you have really small or really large nuts. You want to fully get the shells and inner skin off (scraping it if you have to). Usually, if you bake them for this amount of time, the shells and inner skin will already be off.
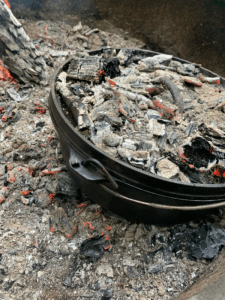
Open Fire. Just like the famous Christmas song from the 1940’s says, you can absolutely roast chestnuts over an open fire. I have roasted chestnuts with a Dutch Oven for about 20 minutes over open coals, both indoors in our open fireplace and outdoors. I’ve done this both with a lid and without a lid. Just make sure they are scored really well so they do not explode.
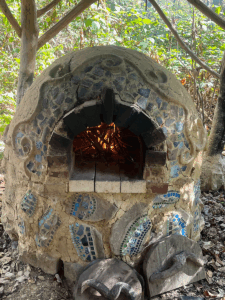
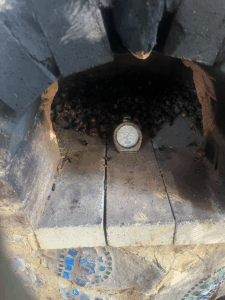
Earth oven. My current go-to method for bulk chestnut roasting is using my earth oven, which requires only a small amount of wood to bake in for hours and hours. For this, the temperature may be higher than 350 degrees, so I just keep an eye on them till they are done. About a month ago, I roasted a large batch of chestnuts at about 500 for 15 min. The only thing I didn’t do that I will do in the future is put them on baking trays–they were hard to get out of the oven and rolled around, and also had some ash on them. Lesson learned.
Peeling Your Chestnuts
Once they are roasted, the shell and inner brown skin should come off easily. If it does not, you might need to roast for a little while longer. You want to see the shell literally peeling back from the nut, to reveal the yellow nut inside. Sit with a friend, some good tunes, and take the time to peel them.
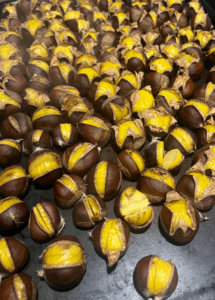
I will say that in traditional food preparation, there’s a lot of repetitive work like this. It is pretty crappy often to do by yourself, but get a friend or some company, and the work goes fast and is fun. These activities were typically not done in isolation; they were done in the community. And it feels good as human beings to rekindle those ancestral roots and do these things together in community again.
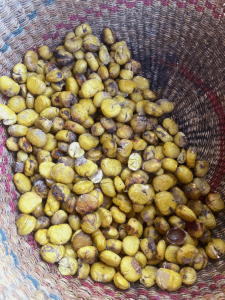
Making Chestnut Flour: Chopping, Drying, and Grinding
The next step is to chop the big chunks up. There are a few options here, and it depends on what tools you have available.
1) Grinding with a food processor. If you have a food processor, you need to chop up the nuts as finely as possible with your food processor when they are still fresh, then dry them and pound them finely with a mortar and pestle or even a coffee grinder dedicated to nuts and herb grinding (and not the foulness of coffee).
2) Grinding with a grain mill. If you invest in a small grain mill, the approach here is to coarsely chop your nuts (I like to use a food processor for this, but you can also do it by hand pretty quickly if you have good knife skills. Get them into coarse chunks and then dehydrate them in a dehydrator at 110 or 120 degrees for about 8 hours until they are thoroughly dry. You can also dehydrate them in a warm oven or even in your earth oven overnight as it cools. Coarsely chopped chestnut chunks is also the way I like to store my chestnuts long term–in a cool, dark place in a jar with an oxygen absorber works great. You can store them in this state for a year or more. Or stick them in the freezer for an even longer shelf life. Then, when I am ready, I can grind them into flour.
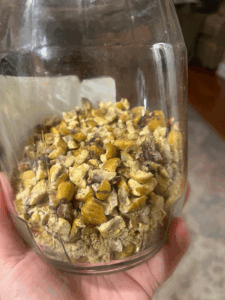
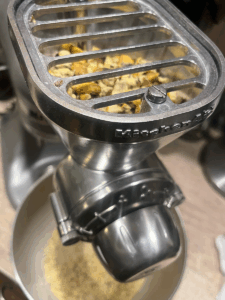
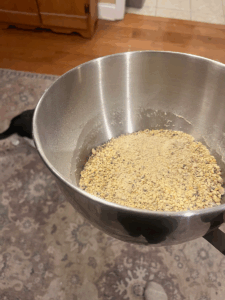
Once you have dried nutmeats, it is time to grind up your nuts for flour. Grain mills work much better when the nuts are dry. and fresh nuts will clog the mill. This hand-crank grain mill will produce a very fine flour (and can be used for rice, corn, acorn, or chestnut). A few years ago, my sweetie gifted me a Kitchenaid mixer. I now use a grinder attachment for coarse grain, then chop it up further and use the hand crank mill for refining it. Either way takes some time, but it is sooo worth it!
Long-term Storage
Chestnuts dehydrated or in flour form do not have a particularly long shelf life–about 6 months. If you are going to eat it in the winter, great. But if you want to save it for special occasions, you are better off putting it in your fridge, freezer, or root cellar.
Recipes
The best part about doing all of this is, of course, the eating! Here are a few of my favorite recipes:
Chestnuts and Squash Dish
One of my favorite ways to eat oven-roasted chestnuts is to roast them in the oven, and then coarsely chop them and add them to the top of a freshly baked squash (butternut, acorn, delicata, kurdi) or a pumpkin with some butter, cinnamon, and nutmeg or to a fresh pumpkin/squash soup. Delicious!
Sacred Chestnut Bread
- 1 cup chestnut flour
- 1 cup flour (white, wheat, or GF- I use organic bread flour)
- 1/2 teaspoon salt
- 1.5 tablespoons of baking powder
- 1 eggs (I use duck eggs)
- 1 cup milk (you can use rice or soy if you prefer
- 3 tablespoons oil or butter
The chestnuts are naturally pretty sweet. Sometimes I like to add a little extra sweetness in the form of 2 tbsp of honey or maple syrup–your choice.
This recipe makes one loaf (you can double it to make two!)
Preheat your oven to 400 degrees. Grease a loaf/bread pan. Mix your dry ingredients and wet ingredients separately, then mix them together, just enough to integrate. The batter will be thick and a bit lumpy–that’s ok. Pour your batter into the pan and place in the oven. Bake for 30-40 minutes, till a knife or toothpick inserted into the center comes out clean. Pull out of the oven, remove from the bread pan, and then let cool for 10-15 minutes before eating. The bread will keep for a week in the fridge or can be frozen.
Conclusion: Leaning into Ancestral Foodways
Bringing back chestnuts as a staple food crop can help us transition to more locally-based, resilient, and sustainable eating. Chestnut is a tree that you plant once and gain a lifetime of harvests–and a gift you can pass on to the next generation and to all life.
Dear readers: Do you have any stories of chestnuts to share? Recipes or experiences? I’d love to hear more!



I’m curious what kind of chestnut you planted on your property. Did you use the Darling cultivar of American chestnut? How are your trees doing?
I planted American Hybrid chestnuts – this cultivar from Oikos Treecrops. They are doing great!
https://oikostreecrops.com/products/American-hybrid-chestnut-nuts/
Chestnuts can be done in an airfryer: cut an x or large slit in them. Soak them in water for 15 minutes, drain & pat dry. Preheat air fryer to 400F. Place nuts in an even layer without crowding. Cook 10 to 20 minutes till nuts appear to open. Swaddle in kitchen towel to steam for 15 to 20 minutes, this makes inner skin loosen. Peel & enjoy.
Cool, thanks for sharing! I have never tried them in an airfryer.
Last week, I prepared some of it – in airfryer! Ohhh they are delicious and give a comfortable feeling.
You roasted them in an airfryer? That’s a great idea. How did you do it?
I have ~10 hybrid Chestnuts (Chinese/Euro/American genetics) planted on my land and plan to plant 3-5 more. The planted ones are ~3 years old and threw a few chestnuts this year, although I try to knock off any flowers/young fruit I find at this stage, since the trees are so little. I am working with both a local wilderness school & a local high school to stratify some chestnut seed this winter for planting out in the spring. It’s such an important tree to return to our landscapes!
Side note for newbs: the hybrid Chestnuts are not a canopy species, so really are not a good species for wilderness/unmanaged areas, as they will eventually be overshadowed by taller trees, if not managed for sunlight/clearing. The American chestnut is the only one that is a canopy species, but is still *very* susceptible to chestnut blight.
Thanks for the info, Janet! I’m surprised you are already getting chestnuts from such small trees!
Hi Dana,
Some of the hybrids can begin significant production w/i 6-7 years, so I wasn’t totally surprised to see a few at Year 3. However, the trees are too small in structure & maturity right now to bear a crop, so I try to pull the flowers if they show up. It’s a lot of fun, watching the trees take root & grow! I’m sure the wildlife will love them, too.
I so love chestnuts and planted a couple maybe 15 years ago. However, I got only one nut in that time, as I didn’t plant them closely enough to pollinate each other. How closely are yours planted?
I have two trees next to each other. At my parents house, we have two trees that are about 50 feet apart and they pollinate well. Plant another tree and soon enough, she will pollinate! 🙂 My parents had the same problem and that’s why I planted more for them. I purchased a 5 years old tree and within about another 5-7 years, the trees were pollinating each other.
[…] When we talk about expanding our homestead’s food sources, we often think about the usual suspects like beans, corn, and potatoes. But there’s a whole world of other possibilities out there, especially if we look to trees and less common grains. Chestnuts, for instance, are a fantastic option. These nuts are packed with carbs and can produce a good harvest every few years. We’ve found them to be pretty straightforward to grow and even simpler to harvest. Plus, they can be eaten fresh or transformed into chestnut flour, which opens up a lot of baking doors. You can find more details on how to handle them here. […]