

When I was a child, my family and I would spend hours carefully drawing melted beeswax onto eggs and dyeing them, the rounds of successive colors growing darker and darker. Once an egg had been fully dyed and covered in wax, it was time to unveil the magical colors, the revelation of incredible, magical works of art. Pysanky, or Ukrainian Eggs, is an old tradition still in practice here in Western PA; it was brought over from Ukrainian peoples and others of Eastern European decent and spread throughout the area (it was later suppressed in the old world by the Communists, who claimed it was a “religious practice” for a number reasons, some of which we’ll explore in this post). I’m not sure how my family originally found our way into this practice, but every year, we would make our delicate and beautiful works of art and display them on a bowl in our living room. This year, my mother put a bowl of them out for Easter, and I wanted to get back into this lovely art form, this time with a bit of a magical twist! And so, today, we will dive into the art of crafting magical eggs using batik techniques! This is an absolutely perfect magical art form to practice at Beltane–hence the timing of this post.
This Beltane-themed post has two parts–first, I wanted to explore some of the traditions and mythology surrounding these magical eggs. And in the second half of the post, I’ll show how to make your own psyanky eggs.
What is Pysanky?
Pysanky is a permanent art form where the artist uses a wax-resist method to preserve colors during a dye process. The egg has all of its contents removed (yolk, white) and is washed out so that the shell is all that you are working on–this creates a permanent art form. Essentially, you add wax to the color you want to remain that color and then dye the egg a darker color. Everything that isn’t covered by wax will take that new color. For example, if you want white, you start with a white egg and add wax to all areas you want to stay white, then dye the egg to your next lightest shade (usually yellow), then add beeswax to all the yellow areas. Then you dye it your next shade (green or orange) and add wax to all of the green/orange areas, and so on, until you end with some dark color, often black, dark blue, or purple. The beeswax is removed, and the brilliant colors are revealed. The choice of colors and symbolism adds various magical properties to the egg–this is not just me saying this, but this is part of the tradition. The egg is ready to display for a blessing of prosperity, health, or more!

Pysanky Lore and History
In Eastern Europe, and eventually the USA, the tradition of egg dying and egg marking is quite old. It’s not just Ukrainian, but nearly all Eastern European peoples have traditions of drawing on eggs with beeswax and adding dyes. Scholars are pretty sure that this tradition dates back to pre-Christian times (so perhaps even the times the druids were hanging around in Gaul!) due to the nature-based symbolism and enormous amount of magic and folk legends surrounding the eggs.
One of the oldest traditions on the magic of Pysanky is from the Hutsul people, who believed that an evil serpent is bound to a mountain cliff, with heavy iron chains. The monster has many envoys, who he sends to pay attention to people in villages–if he hears news that the people are ill, suffering, angry, or at war, he laughs and shakes the mountains, loosening his chains. If this were to go on long enough, he would be let loose upon the world with his chains falling away and causing evil and destruction. If his envoys tell him that people are happy and in high spirits, he grows angry and the chains grow tighter. If people are making pysanky, that they are still making them and carrying the tradition forward, he gets very angry and thrashes about, which makes his chains grow even tighter! His head beats against the cliff (thunder), his chains grow tighter, and sparks (lightning) begin to fly! So this folk method suggests that the pysanky literally keep the world safe (more legends can be found here).

There are a few other bits of information I’d like to share. Many of these come out of really books and papers on Pysanky that are in my personal collection on the subject:
- “The Egg, as the embodiment of the life principle, has been associated with mythical and religious ceremonies since the earliest pagan times…each province, each village, each family has its own special ritual, its own symbols, meanings, and secret formulas for dying eggs. These heritages are preserved faithfully and passed down from mother to daughter through the generations.” (From Ukranian Easter Eggs by Yaroslava Surmach, 1957)
- “The custom of decorating pysanky is observed with the greatest care, and a pysanka, after receiving the Easter blessing, is held to contain great powers as a talisman. A bowl of pysanky was invariably kept in every home, serving not only as a colorful display but also as protection against lightning and fire.” (From Ukranian Easter Eggs by Yaroslava Surmach, 1957)
- “Peasants placed krashanka shells [krashanka are the solid, dyed eggs] in the thatched roofs of their homes and under hay mounds to turn away high winds. Beekeepers put them under hives for a good supply of honey. On St. George’s Day, a krashanka was rolled in green oats and buried in the ground so that the harvest would be full and not harmed by rain or wind. The Krashanka was also credited with healing powers. A krashanka, blessed on Easter eve, was suspended on a string from the neck of a seriously ill person, or touched to infected areas on persons suffering from blood poisoning to effect a cure.” (From Ukranian Easter Eggs by Yaroslava Surmach, 1957)
I’ll get into more detail on the symbols themselves used in the eggs later, when I talk about how to make the eggs. And so, what we see here is a lasting, magical tradition surrounding the creation of these eggs.
A Synthesis of Traditions: A Modern “Druid’s Egg”
So on the other side of Europe, we have the occurrence of the “Druid’s Egg” that is discussed in connection with the Ancient Druids. I am not, in any way, saying that these traditions are connected or the same thing. But I do want to consider some parallels. Of the Druid’s egg, Pliny writes in his Historia Naturalis of the ancient druids: “The magical practices of the druids, their knowledge of botany and the sciences. They wore a distinguishing badge, a “serpent’s egg” worn on the bosom and regarded as a potent talisman.” Other writings, also from Pliny, show that these “druid eggs” were created naturally, in a snake pit, and that the eggs were very magical, protective, and held in high esteem by the ancient druids who wore them as protective talismans. People used these eggs to win court cases and gain a “favorable reputation” with princes. And people were even killed if they had them in their possession due to their potent magical effectiveness. Obviously, in modern Druid Revival orders, we don’t take the idea of the druid’s egg quite so literally (after all, even historians aren’t sure what the druid’s eggs actually were), although the idea of the “druid’s egg” certainly is woven into some of our lore and practices. I think this bit of history gives ways for new interpretations of the “druid’s egg” and how we can manifest it today, through the bardic arts.
There are some parallels between the traditions that are interesting to note. If we study the artwork of many of these pysanky, there is an “entwining” feature that naturally occurs due to the nature of the egg. We can, in making these eggs, create entwining patterns that make a nod back to the original producers of druid eggs, serpents. Druid eggs were said to be highly magical and rare. And the same can be said of pysanky: not many people do pysanky today either. I’ll also note the importance of serpents in both sets of traditions; in both they are dangerous, and the egg is somehow connected to them and their power. Finally, the magical powers of eggs in both traditions, especially for protection, blessing, and power.
Given some of these parallels, I’d like to propose that one modern “druid egg” can be the pysanky and it’s something we can embrace and practice as a magical art form. So let’s get onto the best part: how to make these delightful eggs!

Materials Needed
Dyes for Eggs
Commercial, very bold, and beautiful dyes for pysanky are readily available. These dyes can be put in a wide mouth pint canning jar with a lid and used effectively for 2-3 weeks (after that they lose their dye capacity, and even reboiling them doesn’t allow for them to stick. I’m still trying to figure that out). A good source for dyes is this Etsy Shop (Ukrainian Egg Supplies).
But the other option, and the more traditional choice, is to make your own natural dyes. Kozolowski (1977, Easter Eggs…Polish Style) offers some ingredients traditionally used for egg dyes but doesn’t give details on how to make the dye. In my experience, you can boil these down for a long period of time, add salt, alum or vinegar (or boil them in straight white vinegar) and strain them. Its similar to how you’d make any other natural dye. The list below is dervied from Kozolowsi with my own addition of other plant matter and berries that I often use for dyes:
- Yellow: Onion skin, straw, saffron, dandelion flowers, goldenrod
- Orange: Crocus petals, goldenrod
- Red: Red beets, plums
- Green: Spinach, grass, moss, buckthorn berry
- Blue: Sunflower seeds, logwood, Huckleberry
- Purple: Blackberries, elderberry
- Brown: Alder cones, coffee, walnut husks
- Black: Walnut shells, alder bark
- Pink: Pokeberry
Of course, the problem is that not all of these dyes show up at the same time of the year. I have had good luck in making the dye and then freezing it till the right time. I’ve also experimented with drying the berries and trying to make dye later, but that has been less successful.
Tools and Materials
-

Tulip egg my mother made Kitska: You will need some tools to draw designs on your eggs. These tools are called Kistka (kistky; plural), for your eggs. You can get them at the supplier listed above or readily online. They are very simple tools–I like the ones with the little reservoir and the plastic handles. You can also make your own.
- Wax: You will need some beeswax in either little granules or a block.
- Candles: You will need 1 candle per person to melt the wax.
- Workspace Protection: You will want to lay down a plastic bag or newspaper around your workspace, especially the area you are dyeing the eggs. The dyes can really stain a countertop! You may also want to have some paper down around the areas where you are adding the wax.
- Egg blower: You will want to invest in this little $12 tool–its an egg blower, and it allows you to easily blow eggs out prior to starting your dyeing. When I was a kid, we used to blow them out by creating two holes, one at each end, and just blowing and blowing till all the insides came out. For one, its a lot of work. But for two, its now dangerous to do so due to the high level of salmonella in eggs today. The egg blower is amazing–you can blow out about a dozen eggs in 45 min or less! Here’s where you can get a nice egg blower.

The Eggs
The eggs themselves should be carefully selected for the following qualities:
- Eggs need to be whole (not cracked at all).
- They need to have minimal bumps, and instead be smooth.
- They need to have a pleasing shape (symmetrical) and of a shape you like.
You can start with white eggs or, if you prefer, you can start with a light brown, cream, or even blue chicken egg as the base color for your design. I have found that getting an assortment of nice eggs at a local farm gives me a wide variety to work with. The shells of these eggs are also usually thicker and better than those factory-farmed eggs in the store. You can also use duck eggs–but beware that some duck eggs have a film that you may want to scrub off. I am really enjoying working with duck eggs!
The Process
So now I’m going to walk you through the full process of making your own beautiful pysanky! As I said before, this is a great activity do do around Beltane. I’ve taken to starting my Pysanky making at the Spring Equinox and wrapping it up around Beltane, so I have a full 8 weeks making these amazing eggs. And without further delay, here’s how you make the eggs!
1. Prepare your workspace and lay out your dyes. You will need to make your dyes according to the package instructions or according to natural dye-making strategies. Make sure you add vinegar to either kind of dye–it helps the dye take better on the eggs. It is wise to place your dyes in a separate area (on a kitchen counter is good) and protect that area well. I also like to get a bit of paper and dip a small piece into each dye and then put them in front of the jar so that you can see what the color looks like. Here’s a dye setup (I’m using commercial dyes):

And here’s a setup for drawing the wax on the eggs. The egg carton holds extra eggs, there are books for reference and a sketchbook for drawing out potential designs. We have a roll of paper towels to keep fingerprints off of the eggs. And of course, we have our candles and tools. We have found that adding a little cardboard box below the candle catches drips and keeps them off the table.

2. Select your eggs. Select eggs that are free of cracks and that are smooth and well-shaped (see above). Have some extras available, cause you will likely break a few in the drilling and blowing process (or even drop them at other points–try not to!)

3. Blow out your eggs. We use a Dremel drill to drill a small hole in the bottom of the egg. I will sit the egg in a small cup, place a paper towel between the cup and the egg, and then drill the egg carefully. I usually drill about a dozen eggs at a time if several people are making pysanky. The second step is to use the egg blower to blow out the inside of your eggs (I blow them into a bowl so that you can make a nice quiche later in the day!) The third step is to add some water to rinse out the inside of the egg. and make sure the last of the egg is out (I don’t add this to my egg bowl). Finally, you can let it dry out by placing it hole down in an egg carton or placing a little bit of paper towel up in the hole for 10 or so min.

3. Decide on a pattern or design. This is my favorite part of the process–its here where you decide what your design will look like. I like to use a pencil and very lightly draw my design (or design lines/guides) on the egg (the pencil will come off later in the process). You can also use a string to wrap around the egg so that you get straight lines.
At this stage, you also need to get in your head about how the dyeing process works and do some planning for the different colors you might use. One of the biggest beginner mistakes is not to have enough contrast between colors–remember that its contrast that makes the different colors stand out. If you end up with three light colors next to each other, the egg won’t be as beautiful. But if you use light and dark colors next to each other, it makes the designs stand out more.
You also want to do your first few eggs simply. Maybe do a white pattern, a light blue pattern, and then dye it dark blue and that’s your first egg. That will allow you to see how it works without getting too complicated for your first egg.
There are many options for designs and colors, as you’ll see under “symbols in pysanky” below–and all of these symbols and designs have meaning. In addition to the traditional ones I’ve listed, we have an assortment of other kinds of symbols you can draw upon with meaning: spirals, celtic knots, awens, and more

Symbols in Pysanky
The designs in traditional Pysanky all have meaning. I have worked to compile the list of symbol meanings from various sources from my book collection on pysanky: Ukranian Easter Eggs by Yaroslava Surmach, 1957; Easter Eggs….Polish Style by Lawrence G. Kozlowski (1977); Ukrainian Easter Eggs by Linda Gruber, a handout by Martha Winchorek titled “Ukrainian Pysanky (Easter Eggs) Designs) that is undated; and a handout titled “How to Make Ukrainian Pysanky (Easter Eggs) by the Pysanky Committee, Ukrainian graduates of Detroit and Windsor (undated). The traditional symbols and magical meanings are as follows:
- Dots may represent stars or may be used in conjunction with lines to form a division on the egg
- Ribbons, lines, or belts, those that encircle the egg, represent eternity (since they are continuous lines)
- Lines in a pattern that would make a net are one of the most ancient designs, and are associated with the Hutzul people’s myth of the snake
- Triangles are symbolic of the trinity, also the elements of air, fire, and water
- A comb/rake is symbolic of the harvest
- Flowers – symbolic of love and charity; happiness
- Stars – An 8 pointed star has particular pagan connotations (it is connected to the pagan Sun god, Atar; which connotes sunshine); stars are usually placed on the broad side of the egg and are very common
- Pine tree or fir tree – symbolic of youth and health
- Poppy or Sun – good fortune
- Crosses – usually occur in the Greek style, with four similar arms; they can be symbolic of Christianity, but there are surviving designs and motifs that show this symbol is much older
- Reindeer, Deer, or Horse– symbolic of wealth or prosperity
- Rooster – Symbolic of fertility or the fulfillment of wishes
- Birds – symbolic of happiness
- Butterfly – symbolic of nature and resurrection/transformation
- Horns, Spirals, Bends, Maidens: Combinations of spiral lines; these appear in several books but no meaning is given
- Zig-Zag or Double-Zig Zag Pattern: (Called a wave or saw). When this occurs in two parallel lines, it denotes death and was used for funeral palls. So its RARELY used in Pysanki for that reason (the eggs are symbols of life and light!)
- A spiral: Also used, connected to nature
- A circle with a dot in the middle: represents something bright and noble; represents the sun and good fortune
- A circle with a cross inside reaching the edges: represents the sun; good fortune
In Ukrainian Easter Eggs Gruber writes, “Every mark that is placed on an egg has a meaning. People with expertise in Pysanky can distinguish between eggs decorated in different sections of Ukraine and even between villages. In the villages, certain families have come to be known for their distinct patterns” (3). I find the symbolism here, pulled from old books, utterly fascinating. Some of this same symbolism shows up, unsurprisingly, in the old esoteric lore! You can also use any other symbolism from within other spiritual or magical practices (such as some of the symbols I included here in an earlier post).
Ok, so at this point, you have your dyes made, your eggs drilled and blown, and a good design in your mind (and maybe drawn on your egg) complete with magical symbolism. Now comes the fun part!
4. Add your first wax layer. Your first wax layer will be of your LIGHTEST color–that is typically white, but it might also be a very lightly dyed first color. You add the wax by heating up your tool, then scraping or dropping some wax into the tool, and wiping off the excess before drawing the tool across the egg.

5. Add your first dye layer. Before adding your egg to the dye, you will need to seal up the drill hole with wax before you put it in the dye bath. A little gob of wax does the trick here. So, you can now dye your egg with the lightest color that you want to use in your design. Typically, this is yellow. The longer you leave your egg in the dye, the darker the dye will become on the egg.
Since your egg is hollow, you will need to weigh it down the egg so that it is fully dyed. We found that a 1/2 pint jar works perfectly for this! I forgot to photograph this, unfortunately (so no photo here). But basically, you can use an empty 1/2 pint canning jar; it fits in a 1-pint wide-mouth jar that you are using for dye, and it will weigh the egg down. Wait a few minutes, and pull your egg out often to check on the dye and see how you like the color. Then when you are happy with the intensity of the color, pull it out of the dye and let it sit till it is dry again. It’s for this reason that we usually work on 2-3 eggs at a time–some are dyeing, some are drying, and one we are actively working on! If you want a REALLY deep color, you can even put your egg in for several hours (or overnight) and you will get very intense colors.
6. Add successive wax and dye layers. You need to think about how the different colors already on the egg will interact with any colors you later put on the egg and plan accordingly. This means you need to play for the dye path you will take. So a few typical paths that you can use to dye include:
- White–> yellow -> orange –> red –> purple –> black
- White –> Yellow –> light green –> blue –> purple –> black
- White –> green –> blue –> Red (which makes purple) –> black
And so on. Each layer gets darker, and it’s hard to go between complimentary colors on the color wheel (e.g. green to red makes a brown; yellow to purple makes a brown; blue to orange makes a brown). As you work with the dyes, you can also experiment with different color combinations.
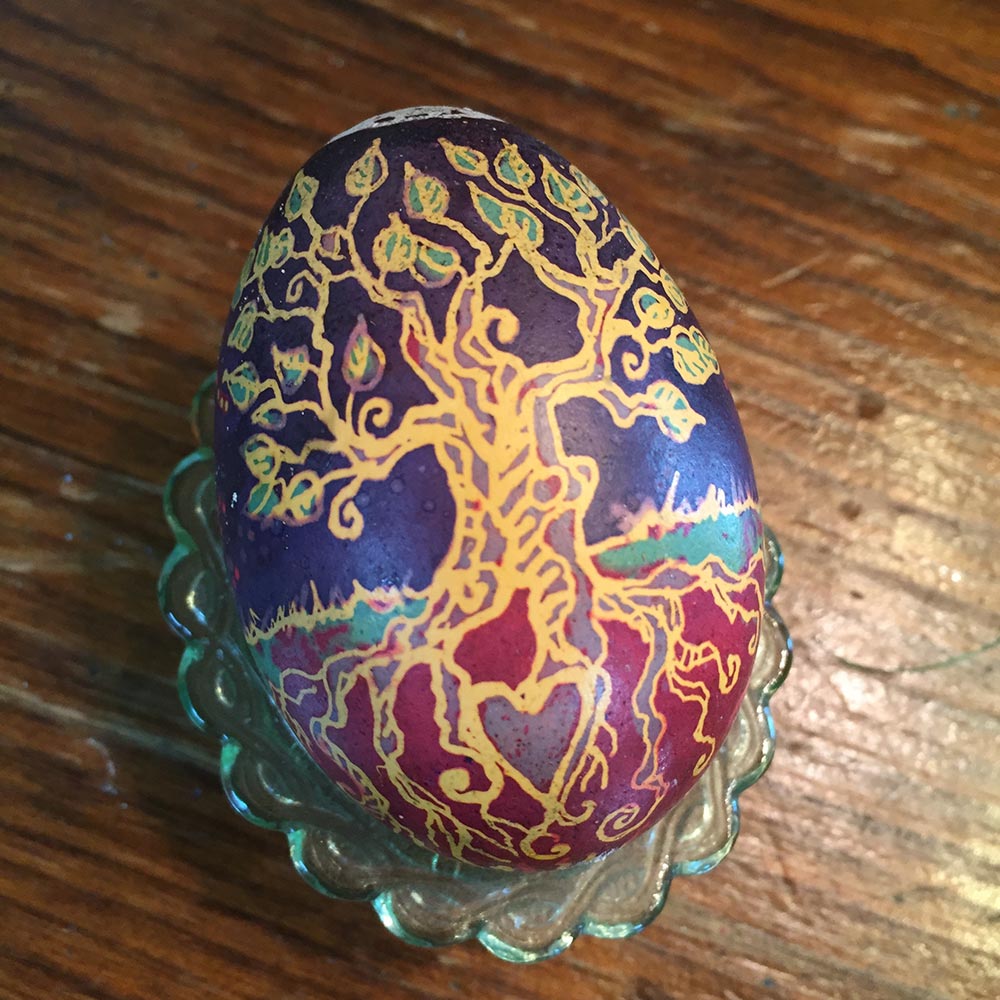
Here is an example of the successive layers of dyes that I used for my tree egg.


7. Allow the egg to fully dry after the last layer of dye. I would recommend at least an hour total for the drying time before you proceed with removing your wax (although it is hard to wait!). You melt the wax off by holding the egg carefully to the candle for brief amount of time and wiping the wax off with a clean tissue or paper towel (a tissue works better).


8. Finish the egg and display! You can leave a thin layer of beeswax and wipe it all over the egg to preserve it. A lot of people choose to use varnish on their eggs to help seal in the colors, but I haven’t done that and they last just fine. But at the end of this process, you have an incredible work of art! Here’s the finished egg from my earlier photographs:
I hope that you’ve found this post to be an inspiration to you on your path deeper into the bardic arts! I have found making these eggs to be a wonderful, relaxing pastime. They are unique gifts, full of magic and beauty! Not to mention, they look great on your altar :).


Utterly fabulous Dana! As a batik artist, they have particular resonance with me. You’re so talented! Thanks so much for sharing your talents with us.
I’d love to decorate my garden with rocks with this technique, any suggestions?
I’m not sure if the dye on the rocks would be lightfast. You’d have to try–the biggest issue from my perspective would be the sunlight.
I’m posting a photo to my facebook page for you: https://www.facebook.com/WildPlumStudio. I know it’s not what you were looking for, but when all else fails, there’s paint! I’ve learned that spar varnish holds up the longest in the elements. If you don’t mind it not lasting, then I think you could use a dye-like colorant (acrylic ink, perhaps?), but it would be very transient. Maybe just try doing one tomorrow on May Day, and watch how it does over the course of the summer. Hope this helps!
Thanks–your work is beautiful! Spar varnish is a useful tip :).
Thank yoU! I’m glad you like the technique. You could probably use your batik dyes for the eggs :).
Wonderful! Beautiful! I have never seen such fascinating eggs. 🙂 Thank you! 🙂
xx, Feeling
Thank you! I’m glad you enjoyed them 🙂
I actually learned this process in I think Middle School. I was taught this process of using wax and dye. I did this with my kids and got away from it. This reminder has inspired me to teach my Grandchildren. Now I know another side to the tradition that I did not remember or did not know. As Always, Thanks!
Awesome! I would love to see your creations! 🙂
Great read! Been doing pysanky since 2000, then fell out of it for awhile, and later on, felt like doing this craft alone was sapping my interest and motivation. I created a Meetup group locally to write pysanky and so far have been busy almost every Saturday with a core group of 3 of us, with the odd member dropping in as able. I think one reason I had stopped doing the craft was because I was inundated with newfangled designs and colors, like those of So Jeo, a Canadian artist who does Persian rug designs on her eggs. Those are exquisite and I give her a lot of credit… but one thing we discussed in my group was that the old designs should not be modified too much because they have the weight of years, tradition and power behind them. This made me feel so much better and validated my resistance to changing too many things, and encouraged sticking with the traditional white, yellow, orange, red, and black, with blue or green accents. That said, I like your green and growing spiral designs and the Awen design, as well and am inspired to try that next week. 🙂
I’m excited to hear that you make these as well, Kieron! I think there is benefit both to practicing some of the older designs but also experimenting with new traditions. I have been doing that myself–using the traditional patterns and also using my own unique artistic style in these eggs. I do have some that are very traditional (like the Rooster/Hen egg, which is in the bowl of the first shot)! I would love to see some of your eggs as well! 🙂
Here are links to several. 🙂 I’m not sure if the comment will post with the link or whether they will show up in the body of the comment, or what…. You might need to edit.
http://i32.photobucket.com/albums/d6/inishglora/pysanky%20images/DSCN0695.jpg
http://i32.photobucket.com/albums/d6/inishglora/pysanky%20images/DSCN0715.jpg
http://i32.photobucket.com/albums/d6/inishglora/pysanky%20images/DSCN0716.jpg
Kieron,
WoW! Those are amazing. Thank you so much for sharing 🙂
What is the tool that you are using to get such fine lines? Mine are not nearly that fine…are you using an electric tool or something else?
Really sorry but minor correction – it’s extremely unlikely that it was ever suppressed by the Russians. As you absolutely correctly point out this tradition is not just Ukrainian, but nearly all Eastern European peoples. That includes the Russians – I actually used to own a few painted wooden eggs from Russia. You probably meant that it was suppressed by the Communist Party, which would make sense, since these guys did have a big problem with the “religious practices”. The Russians never did, they held religion (the very same religion most of Ukraine has, BTW) in very high regard for the thousands of years of their history (except those 70 years that they were ruled by the Communist Party).
I understand that it is minor and has very little with main topic of your wonderful post and normally I would just ignore it but this trick of wholesale blaming the Russians for everything various Communist Parties have done anywhere in the world (naturally, if anyone suppressed pysanky on Ukraine, that would be the Communist party of Ukraine – their Russian colleagues were busy suppressing religion in Russia) is usually used by the people you probably wouldn’t be on the same planet with if that was an option. So when I saw it on your blog it was a bit like being hit by a 2×4. They managed to get their divide-and-conquer programming even in your subconsciousness it seems!
Please delete this comment (especially, if you do choose to correct your post) since it detracts from the point of your post, which is not only beautiful but very useful as well. Once again – really sorry but it’s scary to see how their poisonous propaganda story finds its way into people’s world view, even in places you’d consider well-protected from it. Thank you for your post!
Hi Leon, I personally don’t have any knowledge of whether or not it was suppressed by Russians. What I was doing there was reporting on the material from the old Pysanky books. Specifically, I found that information in several old Pysanky books (the ones I cited in the blog post). Now, a lot of the books I’m drawing upon are written in the USA between the first and second world wars, and one was written in the Cold War period. So I can totally see how the propaganda got into their books. I can clarify and make a note of the difference between the Russians and the Communist party. Thanks for the clarification.
Leon, You do know that at the time when Kyivan-Rus was in existence, there was NO Russia, whatsoever.
The Ukrainian nation evolved completely independently on the territories of pre-historic Ukraine, while the *Russian* (originally *Muscovite*) nation is the product of intermixtures of small number of Slavic colonists with various groupings of non-Indo-European inhabitants of the vast forested, and sparsely populated territories north and northeast of Ukraine – groupings predominately composed of Finno-Ugric and Altaic elements. Mongolian influences on the formation of the *Russian* nation also have been copiously documented by many Russian historians and authors.
This, the principal racial sub-stratum of the Muscovite-*Russian* nationality evolved through interbreeding among a number of vanquished Finnish tribes (the Mordvians, Mer’ians, and Murom’ians), who resided during the assimilatory processes on the territories of present-day *Russia*, and their Muscovite-Suzdal’ian conquerors, who drove the inassimilable bulk of the Finnish population permanently to the north. Since the XIII century – and for several centuries thereafter — an additional process of infusion of dominant Mongolian blood into this Muscovite-*Russian* substratum was also prevalent. These specific ethnic/racial assimilatory process underlie the predominant Finno-Mongolian anthropological type of the representative *Russian* person.
(Prior to the XII century, NO *Russian* nation existed. Muscovy started calling itself Rus’ only after its conquest and enslavement of the true Rus’-Ukraine in the XVII century – taking arrogantly to itself Ukraine’s name and subsequently altering it from Rus’ to *Russia*.)
The Ukrainian nation, by contrast, has no Finno-Mongolian components within it, but constitutes a rather typical sub-grouping of the Caucasian-Dinarian race, with some independent Slavic-Nordic strains. According to some scholars, they became the immediate predecessors, and, most likely, the direct progenitors of the Ukrainian nation. The Ukrainians’ first formal emergence into nationhood (within the empire of the Antes) was in the IV century A.D.
On the basis of the work by Sir Leonard Wooley, who in 1963, under commission of UNESCO, published the Origins of Human Civilization., it appears that all of the major sub strains of the Indo-European race emerged at various times in the pre-historic past out of the geographical area which today is called Ukraine. Many scholars have concluded, after, also, analyzing the migration movements of the Indo-European race out of the area (today called Ukraine), that his work has definitively helped establish the Sumerian-Trypillian origins of the Ukrainian nation/pre-historic Rus’..
From the earliest times, up until the II century BC, the territories of present day Ukraine were settled by various peoples of Cimmerian –Scythian stock. (Even Soviet scholars, on the irrefutable basis of excavated Scythian barrows, are forced to acknowledge that the Scythians were once the prevalent inhabitants of Ukraine, however they limit the duration of Scythian life in Ukraine to between VIII and III centuries B.C. although some Scythian barrows in Ukraine are more than 5000 years old. (The Scythians once ran a gigantic empire extending from China to the Atlantic Ocean, and in the opinion of some researchers, ostensibly, its center was the territory of present day Ukraine)
Throughout the period of the great tribal/racial migrations which started with the V century A.D., Greek and Roman historians and geographers of that time recognized several distinct groups among the Slavs – the Vanadians in the western, the Slovenes, in the northern and northwestern and the Antes in the eastern regions of Europe. The Antes, settling between the Carpathian Mountains and the regions along the Dnipro River, emerge, therefore as close relatives of the Southeastern Slavs of Ukrainian ethnographic composition. During that period, the Antes developed a mighty empire north of the Black Sea — between the Dniester and Dnipro River regions — which lasted for approximately 300 years between the IV and VII century A.D. After the downfall of the Antean Empire, Ukrainians gained their independence within their newly-created state of Rus’ (X to XII centuries). There was NO Russia. (Travelers such as Slovenes from Novohorod), Polots’ks from Byelorussia and Suzdal’s from the first Muscovite settlements would say they were going *na Rus’* i.e. to Rus’)
eon,
I am of Ukrainian heritage- both parents are from Ukraine. I have made these eggs with the kitska, beeswax and dyes. The sacred roles that eggs and birds took from the earlier bronze age, where stone eggs, or oval stones have been found, sometimes these are called shaman stones. The bird cult was an integrated and complex culture rooted structure of nesting (the hearth of home) in its core and its connections to bird flight, which in ancient symbolism of woman meant soul flight. the eggs, the stone eggs transformed into images of the body of woman and the changing of a woman’s position from Sun (Sky Goddess) now a Sky God (God in religions) and the return of the earth goddess where eggs are attributed to a solar tradition in pagan era’s rather than the fertility eggs of a woman’s body in a goddess culture. The yolk inside the egg is the nourishment, just as woman is nourishment to all of humanity.
Some think that the stone eggs or shaman stones have great magical value, and were originally made as talisman and amulets. This eventually evolved into modern folk art, in Eastern Europe, the Pysanky egg representing Spring.Findings have been reported from inner Mongolia at Hutouliang and Southern Siberia at Krasnji Jar in Trans Bajkal of large ancient Struthiolothus Ostrich eggs in Cherson, Ukraine, and of Stone Eggs in Visoko on the Bosna River. Neolithic burial jars of old European cultures such as Cucuteni-Trypyllia were often egg-shaped, while clay eggs were often buried with the dead, symbolizing the regenerative power of the Great Goddess. The primary symbolism of Old European burials focuses on the tomb as the womb for the regeneration of life.
Helena,
Thanks for the additional information. This is really wonderful stuff and shares even more of the heritage of these eggs 🙂
I had no idea.
Reblogged this on Rattiesforeverworldpresscom.