I’ve always wanted to make mullein torches–which go by several colorful names: mullein wands, mullein torch, mullein candle, the hag taper, the hag candle, witch’s candle, Jupiter rods, candlewick, king’s candle, or even the holy mullein hag wand! These mullein torches span back to at least ancient Roman times, when the ancient Romans would dip Mullein stalks in tallow (rendered beef or mutton fat) and burn them. They have long been associated with Samhain and this time of year for the simple fact that this is when the Mullein stalks dry out and are ready for you to turn them into torches! This year, a group of my friends are preparing for an evening outdoor Samhain celebration, and a friend and I wanted to make these to include as part of our ritual celebration`. We experimented with several different kinds of wax and approaches, and this post details our results!
All About Mullein
Mullein (Verbascum spp.) is a medicinal plant that grows in many temperate areas of the world. The genus has over 450 species globally many of them native to Asia and Europe. Here in the Eastern US, Verbascum thapsus, the Greater Mullein or Common Mullein, has been naturalized for over 200 years. Mullein is an incredible plant healer with many medicinal actions including uses for all parts of the plant: the root, leaves, and flowers. Mullein leaves are mildly demulcent and astringent and function as an expectorant, being used extensively for lung healing such as opening the airways, removing lung congestion, and encouraging a productive cough. Mullein flowers are fantastic analgesics and have demulcent, nervine, sedative, and anti-inflammatory properties. I most often craft a Mullen flower and garlic ear oil that is good for ear infections and ear congestion. Mullein roots, from the first-year plants, are anti-inflammatory, anti-spasmodic, diuretic and nervine, and are often used for strengthening the bladder’s trigone muscle when there is leakage (combined with other plants, like corn silk or nettle root!). I’m really only scratching the surface of some of the medicinal properties of this amazing plant–but suffice to say, it is a great idea to have some mullein growing somewhere nearby!
Mullein also has a rich history and tradition in Western folklore and magical traditions–Mullein’s medicinal smoke offers both clearing and protection. Mullein helps connect us to the realms, and the smoke can be used for various kinds of smoke cleansing (Mullein is one of many plants we can craft into smoke-clearing sticks). I love to use Mullein leaves in incense blends, smoking blends, and smoke-clearing sticks for their healing properties. I always look to the plant’s medicinal properties and the doctrine of signatures to better understand magical qualities–and to me, Mullein is a great gateway plant to help open up the worlds of spirit and matter, lift the veil, and connect us to spirits–all while creating a safe space for this work to happen. This is part of why I am excited to work with Mullein as a torch for some serious gateway-opening and protective energy!
Harvesting Mullein Stalks, Wildtending, and Scattering Seeds
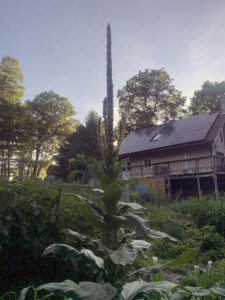
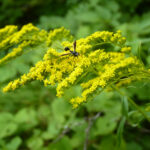
Mullein grows in sunny, open areas and is really quite easy to spot once you know what you are looking for. Mullein is a biennial plant, which means the first year, it grows in a basal rosette and stays fairly low to the ground, no more than a foot high with green fuzzy leaves surrounding the central root, and with a very gentle spirit. In the 2nd year, Mullein gets larger leaves and grows a stalk that can grow over 6′ high. This stalk produces lovely yellow flowers that bloom for a long time, each new flower blooming for one day. The flowers give way to seeds as the entire plant dies back, at the end of her life cycle. For our torches, it is this stalk, with seed pods open, that we are interested in!
After the plant dies back, you want to go find your Mullein stalks. It is easy to find them as they are usually six feet high or more, in sunny open areas so they are easy to spot. I think it’s important to realize that the Mullein stalk contains hundreds of thousands of seeds. As the stalk dries out, the seed pods will open and the seeds will drop. Thus, you want to honor the plant by spreading and scattering the seeds not burning them up in your torch. Begin your harvest by making sure the seed pods are open. If the stalk is still green or the pods are closed, wait a week or two and come back and check again. It is better to let Grandmother Mullein drop her seeds a long while before you harvest her stalk for your torches.
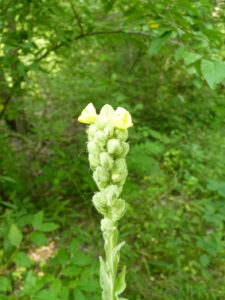
When you are ready to harvest, I also suggest you shake the stalk around and bang the stalk on the ground, making sure the seeds are dropping out and spreading them fire and wide. Make sure those seeds get scattered to honor the plant.
Bring your stalks home and let them dry out another week or two. Again, to honor Grandmother Mullein, before you start crafting your mullein hag torches, take a big bowl and bang the seed pods into the bowl to get out as many seeds as possible. Scatter these in sunny, field areas or around the edges of your garden to support Mullen and allow her to continue to spread her good medicine.
Making your Mullein Torches
For this, you need the following:
- Wax: Depending on how many mullein sticks you want to make, you will need a pound or more of wax. We found that two kinds of waxes worked fine:
- Either use recycled wax from old candles
- Beeswax
- Soy-based wax is too thin and does not work
- I did not attempt tallow (I did not have any) to see how it would work, but if it worked for the Romans, it would work for you too!
- A tall pot filled with water: It will get wax on it, so it should not be for food, especially if you are using recycled wax. I pulled out my soapmaking pot.
- A tall, thin jar or container: I used mason jars but I wish I had had something a little thinner and taller even; some people use the tall, glass candles that you can buy with pictures of saints on them; this would work well)
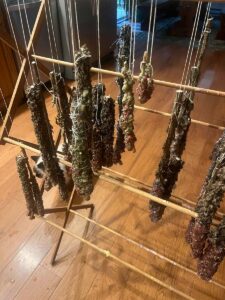
- Torch hanger: Something to hang your mullein torches on as you make them; I used my herb drying rack. While it did get some wax on it, since it is wood, I just used a heat gun and rubbed the wax into the rack, giving the wood a nice oil coating.
- Floor protection: Either cover your area carefully in your house with a tarp and newspaper or do this outside (I recommend outside!) This is a messy process! I used recycled brown paper and then saved the wax-infused paper to start Samhain fires!
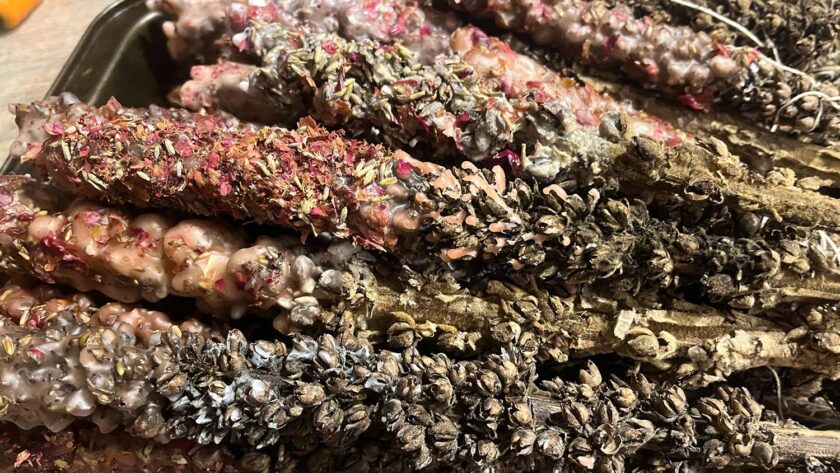
- Herbs (optional): You can roll your Mullein torches in crushed herbs during your last dip. We used rose petals and lavender for an even more magical experience!
- String: to tie to torches together and hang between dips; any string will do. It will also get wax on it. Re-use something if you can!
- Optional: You need to keep your wax jars pretty full..so at the end of your Mullein torch crafting, you will still have a lot of melted wax. You can pour some candles at the end or save your wax pot for next year.
A few notes on the above supply list: Beeswax is expensive and not everyone can afford the amount of beeswax this will take–it requires a lot! Thus, we tested three kinds of wax and found that both the recycled paraffin wax and beeswax (or a mix of both) worked fine for the torches. Since the torches will be burned outside, if you have some old candles or chunks of candles lying around, this can work for you. We also tested soy wax. Soy wax does not work well for the Mullein Torches–it is a thinner wax, and it doesn’t coat the torches well, so I do not recommend using it. We dipped and dipped the soy wax torches, and eventually shifted to use the recycled wax to finish them off. The soy wax did work pretty well for rolling herbs because it took longer to dry.
I will share that this is a really good way to use recycled wax! Since I like to recycle everything, I had a lot of nubs of candles or drips that fell off (both beeswax and recycled wax). I had collected these for several years. They had other bits of stuff in them like the last bit of wick or the little metal piece on the bottom of the candle. It totally doesn’t matter if those little bits are in the wax for your torch. Save these and use them for your torches each year!
Step 1: Set up your space.
This is a very, very messy process and is similar in nature to hand-dipping candles. Thus, you will get wax in your workspace and wherever your torches are cooling in between dips. I did this in my kitchen and put four large contractor plastic bags down and then covered the top with brown recycled paper and newspaper.
One of the fun things you can do is use the newspaper or brown paper covered in wax to start outdoor fires! So save those and you will get yet another use of your wax :).
You will also need extra wax to add to the jars as you dip and the wax level lowers.
Step 2: Melt your wax.
Place your thin, tall jar in your pot and fill your pot with water. Now, place your wax in the jar and slowly heat the wax. Wax CAN catch on fire, so you only want the water hot enough to melt the wax, which means your water doesn’t have to be boiling.
While this is melting….
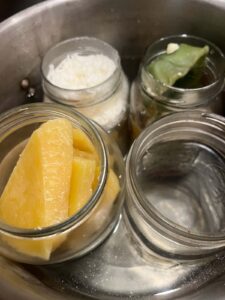
Step 3: Prepare your mullein torches and save all seeds you can.
Some Mullein stalks are really big and some are smaller. We tried a mix of both. You can cut your mullein torches in half if they are larger. However, we found that for the ones that are super huge, we would need to add some kind of handle (a stick, pushed into the Mullein pith will work just fine). Because when they burn, they get pretty intense!
We used some hand pruners to cut the mullein torches to size. Then, before we dipped them, we took a very large metal bowl and once again banged out any remaining seeds on the metal bowl to ensure we were able to save as many seeds as possible.
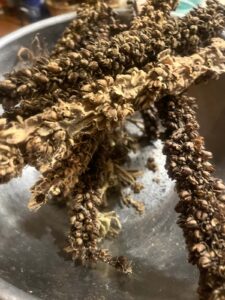
Step 4: Dip Your Mullein Torches
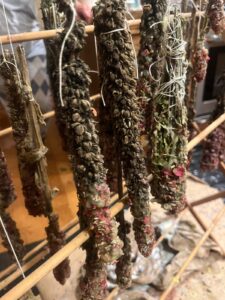
What we found is that the Mullein torches take 4-7 dips in wax to get a good coating, enough to really burn. If you’ve ever created dipped candles before it is an identical process. We tied two Mullein sticks together, and then dipped one and then the other in the jar. Allow them both to drip over the jar for about a minute and then let them cool on the rack. They need about 5 minutes between each dip.
Repeat until all of your Mullein torches have one coating of wax.
Note that you will need to monitor the amount of wax that you have in each jar–add more wax often to maintain a high level of wax in your jar.
Once you’ve gone through all of them, start at the beginning and dip them all again.
Repeat this process until you have a very good coating of wax, about 1/4″.
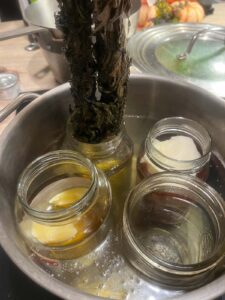
Step 5: Finish Your Torches with some herbs!
This is the last step, but it is optional! We crushed up lavender flowers and rose petals in the mortar and pestle, and then put them in a recycled metal baking pan, and rolled them quickly after dipping. This can add a fun touch.
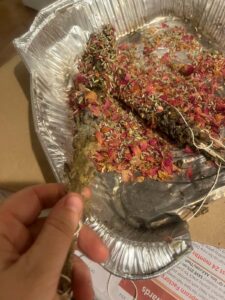
Step 6: Enjoy Your Torches!
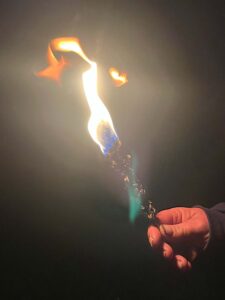
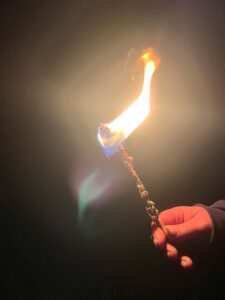
Go outside and light one or more of your torches! They can take a moment to get going, but once you get the Mullein lit, the flame will just build and build! After 5 min of burning, you can dance with them, spin around, and they will never go out! But they will also drip wax, so you should burn them outside only…I think inside the house they would be a fire hazard.
I really love them for many reasons, but the most important is that they can be fully recycled and local. So many options for torches these days are full of hazardous chemicals–and a beeswax/mullein torch can be 100% sustainable and local!
Soon we will build these into our Samhain ritual to help us step further into the dark half of the year, connect with our ancestors, and connect with the world of spirit.
I hope you enjoyed this tutorial–I certainly want to make this a yearly tradition.


I love all of your articles. You are so precise. So wise. So incredible. So talented! I treasure the bookmark you sent to me awhile back. I am going to hunt for some mullein plants. I know just where to search. Thank You again for another incredible article and for such precise step-by-step directions. Blessed Be.
I love this so much! Thank you!
You are most welcome, Christina!
That’s beautiful! I never heard of Mullein Torches before. I will be on the look-out for mullein stalks now! Thank you for the tutorial. Many blessings! /|\
Hi Regina! You are most welcome!
Most ecologists I’ve seen thatre us-based have it out for mullein, as it’s invasive in most parts of the states. However, if I manage to find some, I’ll probably still save the seeds to plant in my garden since I have asthma and I’ve heard smoking mullein is just as good as a rescue inhaler! (Tea as well). I’ve always wanted to make mullein torches either way I hope I can this year
Mullein is an incredible medicinal plant and is naturalized in the US. She is good for asthma, but generally for more wet or expectorant lung conditions. I use New England Aster or very small amounts of Lobelia inflata for asthma. More on NE Aster here:.
Also…I don’t think that mullein is on the noxious invasive lists, but I generally avoid those lists. Why? The age of the anthropocene. I currently live in Western PA but I have a climate similar to Tennessee–my original climate is not in existence any longer, and that requires the entire ecosystem to shift. In another 30 years, I’ll instead live in a climate of what used to be Alabama. The entire native species vs. invasive vs. naturalized species movement is based on a world that no longer exists, and right now, my take is that anything that can survive in my ecosystem and produce food and medicine for all life is a good thing. In the last few years, weve had so many extreme weather events, from the winter (amidst 70 degree temperature drops in less than 5 hours to -30 windchill) or 10 weeks at 90+ degrees in a serious drought can probably be good for survival in the long run. With that said, I’m a bit of a druid permaculturist herbalist radical, haha!
I hope you get to make your torches this year!
Absolutely fabulous! Thank you for the information about Mullein and for these wonderfully detailed instructions on making torches. The timing of your article was serendipitous. My Mullein seed arrived a few days ago. Many of my friends and I have had difficulty sourcing it so when I saw it, I bought several packets to give as gifts. This will be my first time growing Mullein. I can’t wait for Halloween next year to try making a torch or two. I have a whole year to collect wax and look forward to having a go. Thanks again. Blessed be.
Hi Jodie,
Great! Actually, you may have to wait 2 years. Mullein is a biennial, so she will only send up a stalk in the second year. I’m glad you have started the mullein growing adventure–soon there will be lots of mullein for torches :).
Brilliant!! (no pun intended, lol).
will be collecting for winter making.
Tracy
Beautiful Hag Studio, AB, Canada
Hi Tracy! Your studio is Beautiful Hag Studio? It would be even more beautiful with these torches, yay!
Just found this space, and I simply LOVE the Mullein torches! Thank you for showing me a new tradition to add to my Samhain ritual,
Ann Downs